• Skip to primary navigation
  • Skip to main content
  • Skip to primary sidebar
  • Skip to footer
  • About This Site
  • About Me
  • E-Booklets
  • Resources
  • Consulting
  • Site Navigation

My Chemical-Free House

A Guide to Creating a Healthy Home

  • Healthy Building
    • Insulation
    • Windows & Window Treatments
    • Glues & Caulks
    • Grout & Mortar
    • Drywall
      • Drywall Mud & Wall Texture
    • Showers
    • Doors
    • Pressed Wood Products
    • Sheathing & Subfloor
    • Pipes
    • Alternative Building Systems
    • Non-Toxic Prefabs
    • Building for the Chemically Sensitive
    • How to Test Materials
  • Healthy Interiors
    • Flooring
      • Gym Flooring
      • Flooring Underlayment
    • Kitchen Cabinets
    • Countertops
    • Mattresses
    • Sofas
    • Leather Furniture
    • Desks and Chairs
    • Sealers
      • Paint
      • Mineral Paints
      • Linseed & Tung Oil
      • Natural Wood Pigments
      • Natural Plaster
      • Natural Countertop Sealers
      • Concrete Sealers
      • Wood Finishes
    • Bathroom
      • Bathroom Vanities
    • Rugs
    • Wallpaper
    • Kitchen Appliances
    • Heaters
    • Reduce Flame Retardants
    • Reduce New Home Offgassing
    • Reduce Fragrance & Smoke
    • Air Purifiers for VOCs
    • Cleaning Products & Air Fresheners
    • Personal Care Products
    • Green Certifications
    • Gift Guide
  • Exteriors & Gardens
    • Decking Materials
    • Deck Stains
    • Deck Cleaners
    • Exterior Paints
    • Sealant for Concrete Birdbaths
  • Tiny Homes & Trailers
    • List: Simple Homes & Shelters
    • List: Trailers & RVs
    • List: Emergency Housing
    • Cargo Van Conversion
    • All Metal Tiny Home
    • Simple Insulated Shelter
    • All Aluminum Travel Trailer
    • Cargo Trailer Conversion
    • Teardrop Trailer
    • Tiny House Systems
    • Flooring for Vans, Trailers
    • Composting Toilets
    • How to Offgas that New Car Smell
    • Building for Chemically Sensitivity
  • Mold Prevention
    • A Detailed Mold Preventative Build
    • How “High Performance” can Help Prevent Mold
    • The Causes of Mold in Tiny Houses
    • Mold Testing Overview
    • Ozone to Kill Mold
    • Air Purifiers for Mold
  • Extreme Sensitivities
    • Healing MCS – Interview with Solona
    • How I Recovered from Chemical Sensitivities
    • Emergency Housing for Chemical and Mold Sensitivity

tiny homes and trailers

Non-Toxic Travel Trailers for the Mold & Chemically Sensitive

January 6, 2021 by Corinne 88 Comments

This article focuses on the healthiest trailers. The first priority is that the trailer holds up to mold. If it doesn’t hold up to mold, no amount of natural wood, or wool, or other eco-friendly material really matters.

Conventional trailers are extremely mold-prone. They use wood within the walls, roofs, and floors with a design that is not airtight. Condensation usually forms in the cavities. They are also prone to leaks.

The Designs That Best Hold up to Mold are:

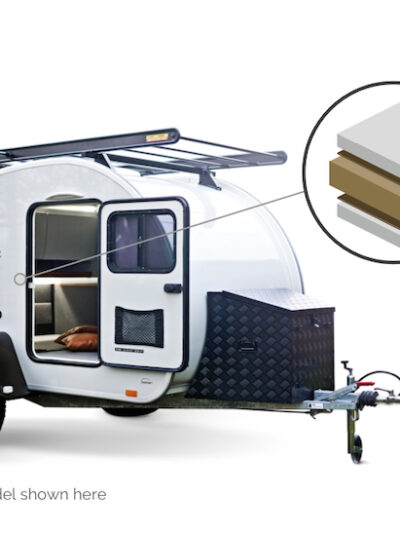
  1. Sandwich construction – Airtight cavities of metal or fiberglass with rigid foam insulation. Ideally laminated together.
  2. Fiberglass shell campers – Solid fiberglass body trailers are single or double hulls. A single hull has no hidden cavity where condensation or mold can form. The double hulls can work well too. I list brands that have minimal wood or where the wood does not become a mold risk.

Low-VOC Trailers:

No well-made trailer is extremely low in VOCs. Some are better than others.

The interiors of all-metal trailers can be lower in offgassing compared to trailers with other wall materials. But don’t underestimate the odors of the glues used in all metal trailers.

There is no getting around the offgassing. The best strategy is to give it some time to offgas or buy a used one if you are highly sensitive.

You certainly can compare models though if you are chemically sensitive since we all are reactive to different chemical combinations. You definitely could find some brands more tolerable than others, even if the total VOC count is the same.

[Read more…] about Non-Toxic Travel Trailers for the Mold & Chemically Sensitive

Filed Under: Mold Avoidance Paradigm, Tiny Homes and Trailers Tagged With: mold avoidance paradigm, tiny homes and trailers

Passive House Tiny House – A Detailed Mold Preventative Build

December 4, 2020 by Corinne 16 Comments

Intro from Corinne

What it takes to Build a Mold-Preventative House

This post is about a meticulously built tiny home, designed to hold up in the long run to mold.

The post is written by the owner/builder who did years of research and consulted with many building science experts.

There was an extreme attention to detail on preventing mold.

The main reason almost every house is moldy is because of the many mistakes made in both design and execution.

These mistakes can be even more prevalent in tiny homes – which are less regulated and often built by non-experts.

This post serves as an example of the care, research, consultation, and attention needed to build a tiny house that will hold up to mold. There is no other article like this online nor in books so I’m very grateful to Terran!

The owner/builder, Terran, also has TILT (also known as chemical sensitivity). There is a focus on healthy materials in the build as well as mold prevention.

This post may have ideas you can use in your own build and it is also interesting to see the kind of detail needed to carefully build a house.

The build itself took over a year.

[Read more…] about Passive House Tiny House – A Detailed Mold Preventative Build

Filed Under: Mold-Free Building, Tiny Homes and Trailers Tagged With: Healthy building, mold avoidance paradigm, mold free building, tiny homes and trailers

Non-Toxic Alternatives To Vinyl Sheet Flooring (for Vans, Trailers, Kitchens, Bathrooms, Schools)

April 12, 2020 by Corinne 11 Comments

Usually, vinyl sheet flooring is used in trailers and RVs. Vinyl sheeting has significant offgassing. The post outlines healthier options.

Metal and fiberglass homes have unique challenges with thermal bridging and humidity, and often require waterproof flooring that can hold up to some moisture.

The following list is the flooring I would specify in vans, metal trailers, fiberglass trailers, and any other tiny house made of metal (like SIPS), plastic or fiberglass.

This type of flooring is often used in commercial buildings and schools and can of course be used in residential kitchens and bathrooms.

[Read more…] about Non-Toxic Alternatives To Vinyl Sheet Flooring (for Vans, Trailers, Kitchens, Bathrooms, Schools)

Filed Under: Healthy Interiors, Tiny Homes and Trailers Tagged With: Healthy building, healthy interiors, tiny homes and trailers

17 Non-Toxic Eco Prefab Homes Compared

February 4, 2020 by Corinne 27 Comments

how to build a healthy prefab, what to look for

This list focuses on healthy non-toxic prefabricated (“prefab”) homes. They must be both mold-preventative designs and low-VOC to be healthy homes.

I have reviewed them myself with input from customers and building science experts. Many need further closer inspection.

When considering a prefab, it’s important to see the detailed design of the build, tour the factory (or have an expert tour it), see pictures of their builds in progress, and if possible, tour a home that is already built by them.

They must be willing to work with a mold-aware architect. Some companies have their network of installers and some rely on you having your own builder.

Many will turn down severely chemically sensitive clients; I recommend bringing me onto the team before getting into materials with them to avoid that scenario.

Before digging into the reviews of 17 “green” prefab companies, we are going to look through what you need to know about the process of building a prefab and make sure the materials are safe and the design is mold preventative.

Building a home, even if prefabricated partially or fully offsite, is still a complicated process to navigate.

This post focuses on standard size homes. If you are looking for smaller and more affordable homes, my post on small and simple homes covers those.

This post contains no sponsored or affiliate content, and I don’t have a partnership or other ties to any of the companies listed.

Steps to Building a Healthy Prefab

  1. See the list below for some prefabs that I have prescreened, or start with one you like.
  2. Screen the prefab design for initial clues into its quality, including any errors in the photos (do an initial review with someone who knows building science). See the list of good signs and red flags below.
  3. Get sufficient photos and schematic details of the design of the build (walls, ceiling, floors). Take them to a qualified building science expert like Cheryl Ciecko.
  4. Talk to others who built with them. Look for reviews of the company.
  5. Talk to the company more seriously to gather more details about the plans if you didn’t get them in step 3.
  6. Get your specific house plans reviewed by at least two qualified building science experts, including the architect that you have hired independently. Plans are made specific to your climate and piece of land.
  7. I recommend bringing on an HVAC consultant to your team, too, to size and spec (or review) the HVAC, including the ventilation.
  8. Bring a builder on board early in the process of design to make sure they are part of the team. (Some companies have builders or work with a network of builders, if that is the case, vet them to see if they are good.) The builder needs to be really good and that’s not easy to find. Make sure that is in place early.
  9. You or someone with building knowledge should supervise the preparation of the land, the foundation, and the install of the shell or modular unit. Supervise all the stages of the build.

Good Signs and Red Flags

  • The age of the company is important to me. They should not be on their first prototypes. Ideally, you should be able to see some of their houses that are at least 10 years old. You should feel confident in the person running the company. They need to be in business (in the future) to honor warranties. There are two good companies, however, on this list that are less than 10 years old (Ecocor and GO Logic).
  • A company without architects or building science experts on the team needs to be looked at more carefully. Who is in charge of the design and how knowledgeable are the project managers? Steer clear of any company that doesn’t promote their building science expertise.
  • If the company provides the General Contractor or works with a network of general contractors, vet them just as carefully. If you don’t have enough choice in who you use to build it out on-site, you won’t get a well-built house.
  • While you should expect to make minor changes to the design with your architect as a consultant on the team, any major design flaws in their models is a red flag.
  • Talk to someone who built with the company recently. If the company is disorganized and the project manager could not coordinate all teams well, that’s going to be a huge mess. Things might not get done right due to this problem (which is a common one with prefabs).
  • I look for the ability to tour the factory—ideally the company owns the factory—and make sure you see a house that is built. Even better if it’s a hotel or Airbnb you can stay in.
  • You need to be able to see details of the building systems/designs system before committing any substantial amount of money.

Pros and Cons of Building Prefab

Benefits to Building Prefab

  • Mistakes are limited in the really good factories—computer planning, precise cuts, fabrication by machines, and panels put together by highly trained technicians limit mistakes that are extremely common in traditional builds.
  • Build out of the rain—the wood and other components are stored inside and stay dry (in theory, if it’s a good company). The panels or modules will be built in a climate-controlled factory. It goes up faster on-site, during a dry time, and should be watertight before it rains.
  • Enjoy cost savings—it would be very expensive to build a house at as high of a quality as some of these on this list from scratch, with high-quality craftmanship like that accomplished in the factory. If you go with a predesigned layout (not custom), prefab helps you save even more. With many companies, you may also have a more fixed price than in a conventional build where many things tend to change.
  • It’s faster—the whole process from start to finish is likely to be faster than with a conventional build.
  • There’s less work for you — while you do have to tour the factory and have the plans reviewed by an architect, you don’t have to supervise as many parts as in a conventional build. Wall and roof panels, and in some cases whole modules, will all be done in the factory setting and, if the factory is good, it’s likely to be done very precisely and correctly. That is almost never the case on-site at a conventional build. Since most homeowners don’t have the knowledge to supervise a build, this can be essential.

Downsides to Building Prefab

  • Have less control—while it might be possible to be in the factory during the manufacturing of your specific panels, you don’t have full control here over supervision in the same way you would on-site.
  • If you are extremely sensitive, you need to have confidence in the factory that they are only using clean wood, stored correctly, etc. (The same goes for all the components, but with the wall systems the wood is clearly the most important part).
  • Ability to analyze and review/change the plans—with some companies, you cannot see the full details of the plans (or the walls, ceiling, floor system) until you put down a deposit. This is a huge problem. The good companies do show their designs.
  • Some companies will not allow you to bring your own architect as a consultant on the plans (though most will). That would be a deal-breaker for me.
  • Supervision is still needed—assuming you were able to have your plans reviewed by multiple experts, and feel confident in the factory making the panels or prefab, you still have a fair amount of planning and supervising on-site, making sure the local team knows how to put this together properly, that the foundation is detailed right, the land was prepared properly, and the final on-site details (like the roof) are done right.
  • On the topic of supervision, if the prefab is a very unusual system, it becomes more difficult to have it confidently reviewed and to supervise it.
  • Possible lack of coordination between teams—with some companies that don’t have a strong process in place and strong project managers, and/or if your builder is not on board from the start, you may have a lot of difficulties arising between the parties, with no clear person/company responsible when things go wrong.
  • Prefabs aren’t typically inspected in the usual way—they are inspected in sections, and the companies have individual agreements with the states to allow them to do “inspections” out of state and/or off-site. When the local inspector checks in order to give you a certificate of occupancy, they are only checking things at the finished level, not the construction level.

Building with Environmental Sensitivities

If You Have Chemical Sensitivities

  • Another thing I look for is to make sure we have control over the finishes in a way that suits your environmental sensitivities.
  • You should have control over: flooring types, all wood finishes, all sealers, all paints, some glues, the shower system, the cabinet company, and the countertops. This is where you want to know how customizable they are (usually very).
  • Elements that are fixed are likely: framing type, insulation, flashing tapes, house wrap/WRB, and possibly window and door types. With these, you want to know if you can tolerate the materials specified. In general, don’t try and alter the main components. Though there might be a little bit of choice here, for example, with the window framing material.
  • With most companies, you have a choice with the siding and roof types.
  • Some of the best companies are reluctant to work with someone super chemically sensitive. Sensitive customers can demand changes that compromise the integrity of the build; a good company won’t allow this and won’t want to deal with it. Bring me onto the team early in the process, possibly before you speak to them. I can work with the whole team to make sure you get products that are healthy for you and they don’t compromise the building system.
  • Prioritize QUALITY over extreme modifications to make something perfect. It’s better to have to wait for your house to offgas, and have a house that will last a long time, than the other way around. Many people are making this mistake – building something too modified for chemical sensitivities that will go moldy and not get them out of the toxic loop.

If You Have Mold Sensitivities

  • The design of the prefab system is the most fundamental part that needs to be done right.
  • Bring your own architect on board, even if just as a consultant. Make sure the designs are solid (reviewed by more than one building science expert) and the final design for your climate and land is solid.
  • Bring your own HVAC consultant to review the system.
  • You need an excellent builder.
  • You need supervision of all parts of the build.
  • You need to know which party is taking responsibility for each part that could go wrong.

Thank you!

You have successfully joined our subscriber list.

Definitions: Prefab, Manufactured, Mobile, Kit, and Modular Homes.

Prefab (Prefabricated)—This is the general term for all of these building types that are made partially or fully offsite:

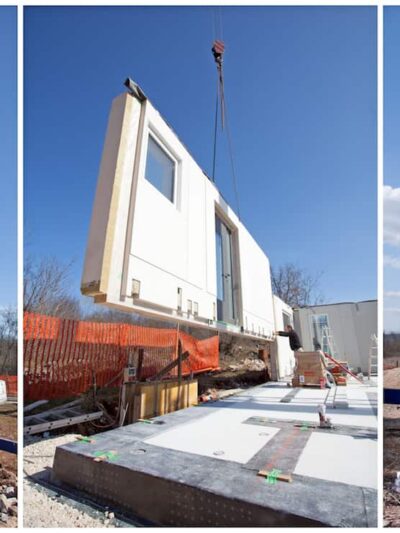
  • Panelized Prefabs—Panelized construction is the most appealing type to me. The exterior walls and ceiling pack onto a truck and are usually assembled with a crane. Some have windows and doors installed at the factory (most of the ones I looked at do), while others have those parts installed on-site.
  • Manufactured and Mobile Homes—I don’t cover these types in the post. Manufactured homes are usually the type of prefab that is in mobile home parks, and are not usually good quality. Mobile homes are homes on wheels (including tiny homes on wheels) and are covered in this post.
  • Modular—Modular homes are more complete than panelized. Modules or boxes are built in the factory and wrapped and taken by a flatbed truck to the construction site. There might be just one module for a small house or many modules that fit together. They are lifted by a crane and set on a foundation. Some modular homes are almost complete when they arrive and others are finished on site.
  • Kit Houses—With a kit home, all of the materials for the house are built in the factory, numbered, and shipped to the site. A kit home doesn’t come with walls or a whole module built (or partially built). Instead, it comes with all the materials you need to build the house, stacked up, and labeled.

Review of 17 Non-Toxic Prefab House Companies

1. Bensonwood Passive Homes

https://www.instagram.com/p/BrnztsHnkTD/

Bensonwood is at the top of my list because it is the most established company making well-made Passive Houses (and other types). They are well detailed for mold prevention, made in a factory that they own.

They came to my attention because the builder Matt Risinger toured their factory and worked with them. You get to see a bit about how one of their models are made in this video. This is the house made by Matt Risinger’s company (which you can see during the house tours Matt puts on).

You can tour the factory yourself, too.

This is a panelized custom prefab. The walls and ceilings are made in the factory and they go up on-site at a dry time of year in one to two weeks. The houses can be built to Passive House standards and they use timber frame construction.

Build Type Options

They have three ways to build:

1) Bensonwoods fabricates the custom-designed shell and installs it (this includes the walls, roof, floors, windows, and door). Your builder does the rest of the finishing, as well as the foundation and site prep.

2) The enhanced shell option includes the shell plus some prefabricated components, such as window casings, stairs, and doors (you can see these options on the website).

3) The whole house option, where the house is completed by one team.

Geographical Area

The whole house option is a finished house, but it is only available in the area around Walpole, New Hampshire. The other options can be shipped to 49 states.

Design & Materials

A typical Bensonwood wall panel would have a service cavity that may or may not be insulated, then an airtight layer of OSB, then a structural framed wall of I-joists or sawn lumber.

The exterior sheathing might be OSB (typically, Huber’s Zip) or a continuous layer of wood fiber insulation. Cavity insulation is dense-packed cellulose. 

Roofs are made with either EPS or dense-packed cellulose.

See my posts on pressed wood products and insulation to see if these materials would work for your sensitivities.

Windows are Marvin Integrity, Unilux, or Wasco. My window post reviews the toxicity of window types.

The wall and roof systems can be seen on their website. It’s important that they do show the wall designs, so they can be evaluated.

Factory. The panels are made in their own factory, called Tektoniks, in New Hampshire.

Established. They have been in business since 1973. They have been building in this factory since 2000.

Build time. The shell goes up in one to two weeks. The typical time frame from 3-D model to construction completion is 5-10 months.

The Process. It is important to have secured your land before developing any formal plans (as with any good prefab company). Decide between the shell, enhanced shell, or whole house package. They take the design and create a 3-D model and then send that to be fabricated in the factory.

Here is a video of their process of installing the shell.

2. Their Sister Company Unity Homes

https://www.instagram.com/p/BcvKRTElubm/

This is the more affordable wing of Bensonwood that was started in 2012. The models are predesigned, as opposed to the custom Bensonwood designs. However, you can still mix and match some of the elements to make the house more personalized.

The houses’ designs range from 500–3000 sq ft. I love that they took high-end wall panels and made them affordable by keeping it to predesigned packages. The smallest house is $150,000. If you want an affordable prefab, go with predesigned.

The models can be made to Passive House standards.

Design and Materials

This company is a sister company of Bensonwood, using the same technology. The panels are manufactured in the Tektoniks factory.

Most of the clients they build for are sensitive, a representative said. You can bring materials home to test them.

The interiors are very customizable.

Just like Bensonwood, they use the same high-quality mold preventative design, airtight builds, and balanced ventilation (air exchange).

Geographical area. New England is easiest, but they can serve a larger area.

Factory. They have factory tours (the same factory as Bensonwood) in New Hampshire. They also have a show house in New Hampshire.

Process

Just like Bensonwood, they offer three options: the shell, the shell with some finishes (both of these completed by your GC), or the completed house, which is only possible local to their site in New Hampshire.

In the most simplified process, you can choose one of the interior collections, including finishes, in its entirety. This is the fastest and least expensive way to do it.

They also have “Personalized” and “Semi-custom” design paths, in which you can substitute choices from outside the collections. If you would like the interior design to be completely customized, they recommend that you go with the Shell Package and you can finish the interior with materials and fixtures locally.

3. EcoCor Solsken Passive Houses

https://www.instagram.com/p/BfMaqHejHdq/

Another panelized Passive House prefab is at the top of my list. Passive House design is focused on well built, well-sealed, moisture preventative design. And this one is certified as well as vetted by well-respected building science experts.

I have heard feedback from three professionals about this house, and they were all positive regarding the design.

What I have heard is that the product is well-made and the knowledge and experience of the team are on point. The management may or may not be great, depending on who is working there.

Materials and Design

They use healthy materials and they minimize the use of paint, varnishes, and formaldehyde to near-zero VOC, they say.

They use the Zip system, with the Zip OSB layer close to the interior (it will offgas to the interior).

Dense-packed cellulose is used in the exterior wall assembly and Rockwool in the interior service wall. No spray foam insulation.

The bulk of their insulation is on the outside. They do not have sheathing on the outside. They use a WRB to hold in the insulation (under the siding).

Moisture-management

Detailed modeling of plans is done in WUFI software—this is a way to model how moisture moves and could condense in the walls/ceiling/floors. They used moisture monitors in the walls of early houses to verify this.

Essentially, they use “out-sulation” (exterior insulation), with a very dry-able (breathable) exterior assembly.

They use mechanical ventilation (HRV).

It’s an excellent design, with knowledgeable team members.

Factory. They manufacture their panels in their own small facility: the Ecocor’s facility in Searsmont, Maine. You can tour the factory.

Here is a video tour about the company.

Geographical Area. Ecocor’s custom designs are delivered anywhere in North America. Check with them about the predesigned models.

How long have they been in business? Ecocor started around 2012, with the Solsken branch of designs launched around 2017.

Costs. One of their 2 bedroom, 1192 sq ft models is about $408,000.

It sounds like they tend to work for upscale houses only (which is not uncommon when you find a really good builder or system, since good quality costs more). This tends to be more expensive than BrightBuilt or Gologic.

This is not your budget option, but it’s not overpriced either if what you want is quality.

4. Morton Metal Siding Structure

https://www.instagram.com/p/Bvb4gS2gM68/

This company makes fairly standard construction metal siding homes and structures and have been reviewed by Cheryl Ciecko. They have worked with her and they are willing to work with her again to make sure it’s designed right.

Process

With the Morton process, many materials are manufactured in their plants (which they own—this is a large company). Building components are shipped to the job site using their trucks. Construction is executed by their construction crews—vet your local crew well.

Construction management is provided by them—again, vet the local management well. This is a design-build firm, which means they take care of the whole process.

They use Allied Design Architectural & Engineering Group, but they will allow your architect to have input on the plans.

Design & Materials. This is a conventional build; it’s not high performance or Passive House. It’s stick framing, regular insulation, metal siding, and drywall. There’s nothing especially unique here other than they are willing to work with Cheryl.

Established. It’s a well-known brand, around since the 1940s with a robust warranty and little risk of the company going out of business soon.

Factory. They are fabricated in Morton, IL.

5. Holz100 All Wood Houses

https://www.instagram.com/p/Bz-y6YYjJl3/

This panelized and module prefab is something a little different. This company makes panels that are made from all wood: walls, ceiling, and floors. No adhesives. No nails. Just wood. Siding and roofing materials might not be wood.

They claim a 50-year warranty on condensation and mold in the walls. The company has not been in business for 50 years though, about 25 so far.

The next step here would be to see if a building science expert (actually, more than one) can look at this wall system, which is a series of pieces of wood with some air gaps, and see what they think about moisture management in that type of wall.

I would also like to see computer modeling of moisture in the walls, and why it doesn’t hit dewpoint in those spaces, or real-life data from the company showing how moisture performs in the walls.

I want to know how they deal with the roof since it looks like they are putting an exterior vapor barrier on the flat roofs that could get tricky for mold fast. The underbelly of raised up wood houses can also be vulnerable to condensation.

If this system holds up the way it says it does, it will be a very interesting option.

I am really rooting for this company, as I think it looks really cool.

Although I’m reluctant to be a test person for something we don’t know enough about I was happy to see Matt Risinger tour this style of home (a company called Holzpur. With the green light from both Matt and SIGA (who sponsored the video), it would make me want to proceed with the next steps of review.

Geographical Area

Most of their buildings are in Europe and you could go see some of the buildings there, including a hotel in Austria, a hotel in Belgium, and a rental. That would be crucial as well, to see how this is holding up in real life. And you can sleep there to see how you feel.

They are also available in the US and Canada.

Cost

The small little room that is just under 100 sq ft is 35,000 CAD.

A tiny house is 39,000 Euros. They make houses of all sizes, including apartment complexes and hotels.

6. GO Logic GO Home

https://www.instagram.com/p/B4fr_hAg4Xt/

These are Passive House-level panelized prefabricated homes. This is another highly respected company. They are a design-build company in Maine. Outside of Maine, they assemble the shell only. Your local contractor does the rest.

Materials and Design

2×8 wood stud wall. Dense-pack cellulose insulation in the stud cavities. Rigid mineral wool insulation between the sheathing and siding.

Taped Huber Zip OSB air barrier. See my post on pressed wood products to review the offgassing of these materials.

The roof is made with prefabricated wood trusses with blown-in cellulose insulation. See my post on insulation.

You can choose from many different design options. Windows are aluminum/PVC or aluminum/wood (triple glaze).

Flooring is concrete and real wood, Marmoleum or tile.

They use high-quality finishes like solid wood stair treads and solid wood trim. Interior walls are gypsum with 0 VOC paint. IKEA cabinets.

You can upgrade or change most of these interior finishes.

Moisture Management

They use meticulous air-sealing between the attic and living spaces and ventilation beneath the sheathing to eliminate the risk of moisture buildup and ensure a durable roof.

They seal the critical joints at window openings, between the foundation and exterior walls, and between the wall and roof structures.

Wall assembly is designed to avoid moisture build-up.

They use mechanical ventilation – HRV. Electric heat (like most Passive Houses).

On-site blower-door testing meets or exceeds Passive House standards.

Costs. Size is 600-2500 sq ft from $179,000 to $567,000.

How long have they been in business? Go Logic (founded 2008) company launched the GO home prefabs in 2017.

Geographical area. Delivered and assembled in Maine. Outside of Maine, they deliver the shell only in New Hampshire, Vermont, Massachusetts, Rhode Island, Connecticut, New York, New Jersey, or eastern Pennsylvania. Your local contractor would provide the site work, exterior, and interior finishes.

7. BrightBuilt Homes

https://www.instagram.com/p/B6gHgsPA8L5/

BrightBuillt appears at first to be a competitor of Ecocor and GoLogic. They make net-zero ready homes that are a bit better than code. Less expensive than EcoCor and GoLogic.

The house arrives in modules as opposed to panels.

Materials

Double-stud walls insulated with dense-pack cellulose. It looks like fiberglass in the roof in some pictures. Some have rigid insulation on the exterior.

Moisture-Management

Air sealing, some use Zip system, some use Blue Skin or Typar. Drainage plane below siding, mechanical ventilation. They have pictures of blower door tests, but it’s not clear if they test all of them.

The lack of information on materials, cross-sections of the walls and ceiling, and details on building science on the website is a red flag for me.

Will they allow prospective customers to tour their factory? Yes.

Customer feedback

They try to be accommodating, but a customer was not happy with their attention to detail or efficiency. Their own photos online show modules arriving with damage to the house wrap and exterior foam.

They claim low VOC, but if they don’t have good enough oversight of their module producer, building for a sensitive client might not go according to plan. You can totally customize the finishes, though.

When a design problem cropped up during the building process, there was no go-to person to address it, a BuiltBright customer claimed. The customer was stuck between the designer and builder, with no one to advocate for them.

If there isn’t a designated project manager or contact person to oversee the project, like what this customer claims, you won’t have the efficiency of what you might expect in a prefab process.

If the management changes in the future this could change.

Process

You have three primary routes you may choose: a pre-designed BrightBuilt Home (from 9 models), a modified BrightBuilt Home, or a custom home.

If you are happy with one of the standard designs, you will simplify the pricing. If you would like to make some modifications to the existing designs, you can make changes to the finishes, spaces/interior design. Or do a totally custom design.

They help you identify a builder.

BrightBuilt designs the modules, passes it on to a company that makes the modules—if anything goes wrong there, BrightBuilt may not be responsible, reports a client. The builder may have to pick up the mistakes made by the other two.

Factory. Subcontracts the manufacturing of their panels/modules out.

Established. They have been in business since 2013. Their parent company (architectural firm) has been around since 2004.

Geographical area. At this time, they construct, deliver, and complete within Maine and the Mid Atlantic region.

8. Module Homes

https://www.instagram.com/p/B601GTCBh7p/

Module uses both wood-based panelized and modular construction. Their houses are built off-site at the Bensonwood Tektoniks factory.

Their first home, the Latham house pictured above, was built to Passive House standards. In the future, all of the homes will be built to the Zero Energy Ready Home standards.

Geographical area. Based in Pittsburgh, modules are made in New Hampshire, they deliver to any area of the US. 

This is a design-build firm: they manage everything “from the first shovel to the last coat of paint”, they claim. Though it’s not clear in which area they provide the full service. The company did not respond by email yet to the question.

Materials

Zip panels with cellulose insulation.

The base model option has fairly standard materials (like IKEA cabinets and laminate countertops). The upgraded options have healthier materials like custom cabinets and solid surface countertops.

Factory. Just like with Bensonwood and Unity, you can tour this factory.

Tektoniks factory is owned and operated by Bensonwood; it’s not owned by Module.

The companies design the panels and send the design specs there to be made.

Cost. One of their two-bedroom homes is $250,000. An estimated 50K more for site work, foundation, and permits.

How long have they been in business? Since 2017.

You can see a video of their first house here:

9. Haus.me

https://www.instagram.com/p/B18aFNzFNUo/

I’m waiting for a prefab like this to really work for those sensitive to mold and not be too high in offgassing. Something like this has the potential to be very waterproof, with nowhere for moisture to condensate in solid plastic walls.

This prefab is modular; it arrives totally complete. It has a metal frame and then they show a spray foam “composite” that makes up the insulation and the exterior. It’s not clear what that is.

They claim it’s a 3-D printed composite polymer (which means some type of plastic). They don’t say what polymer this is. At first glance, it looked like fiberglass. On closer inspection, it does not look at all like fiberglass. They claim it is VOC-free.

The windows are 6 layers of tempered glass!

It’s mobile—not on wheels, but it can be moved anywhere.

You can schedule a visit to one of their demo units at this link.

Geographical area. They deliver from the facility which is in Reno, Nevada. It takes 2-3 weeks within the US to deliver a house. But they are currently backlogged 9 months.

It is possible to ship an assembled haus.me to any international seaport, which also makes this an interesting option for those relocating to Latin America/the Caribbean.

Warranty

For House Frame and Windows: Five year warranty or lifetime warranty.

Maintenance and Warranty Plan: One year of base warranty and free maintenance for home appliances and décor, including furniture and equipment or ten years of extended warranty and free maintenance.

Year Established. They have been in business since 2016 and this is the first prototype.

Keep your eye on them. When something like this passes the test of time, I will share it on my Facebook page and in my email list.

10. Log Cabin Kits

https://www.instagram.com/p/BxgFZ5Ljb9H/

Although log cabins don’t have a lot of insulative value, and they don’t completely skip past the need for intricate detailing, I like the simplicity of solid wood walls with nowhere for moisture to accumulate and hide (in theory).

The logs need to be debarked and stored properly in good mold-free conditions before the build.

And, as always, pay special attention to the roof and foundation which are done wrong in almost all assemblies, whether it’s in the design or execution. Most foundations have water damage.

They are prone to moisture damage in cold climates. Around windows, doors, and building corners are vulnerable areas. Thermal mass improves the performance a bit, but air leakage more than counters any benefit. Cool surfaces + a source of moisture = mold.

I don’t know which log cabin company is the best, but I would use the same criteria of evaluation as with more conventional prefab houses outlined in the beginning of the article.

You still want to have this evaluated by a building science expert to see how log walls will perform in your climate and hold up to moisture and mold.

You also want to evaluate the companies based on their specific “log” system. As these walls are usually square or rectangular, not the classic real round logs.

I pictured Confederation Log Homes because they have a long record and have been in business for a long time. They look like they are building good quality homes, from what I can see in their photos. They passed the initial screening.

11. Method Homes

https://www.instagram.com/p/B5qe0Y3AJUf/

Method makes modular homes that can reach Passive House standards.

Method will build anything an architect designs, as long as it can still be shipped.

Process. You can use their design-build company, Method Contracting, or go with a local builder or general contractor of your choice (“under our direction,” they say). Method has an internal team of specialists and they have an external network of contractors throughout the Pacific Northwest (the US and Canada) that they can recommend and work with.

They don’t say quite as much on the website about building science as the others, but they do say they avoid thermal bridging through either double-stud walls, rigid foam wrap, or a combination of the two.

They do blower door tests to measure airtightness. In order to achieve a very tight envelope, they use the specialty (high performance) tapes like those used to seal the seams of the plywood during framing.

They also use ‘flash and batt’ which is a very tricky method to get right, explained here. I don’t use spray foam in walls due to off-gassing concerns as well as technical difficulties.

They use ERVs or HRVs for ventilation.

This has been reported to be highly customizable.

Materials. Real hardwood floors, 0 or low VOC paints, and glues. In a message, a company rep said, “While we use no VOC products, we are not fully set up to build homes for the environmental sensitive community”.

Area served. Method has experience delivering and building in challenging and remote sites, including the San Juan Islands and British Columbia Islands.

Their manufacturing facility is located in Ferndale, Washington. They service the western US and Canada including Washington, Oregon, California, Alaska, Idaho, Montana, Wyoming, Nevada, Colorado, Utah, Hawaii, British Columbia, and Alberta.

Cost. Base price $162,000.

12. Artisans Group

https://www.instagram.com/p/BeFD8D9AjHr/

Artisans Group is a design-build firm in the Pacific North West. They build prefabricated panelized homes to Passive House standards. They can do custom designs or you can choose from their pre-designed plans. I had to email them to clarify: any in their current portfolio is a predesigned plan.

They work with their network of selected prefabricated Passive House builders who deliver the floor, wall, and roof assembly systems to your site.

They use the design-build model because communication between the design team and the construction team is extremely important in order to get things done right.

The assembly is overseen by a Passive House expert.  

Year Established. They are a large firm, in business for 20 years. They claim they have designed more homes to the Passive House Standard than any other US firm. (Ecocor makes the same claim).

They have a good team that is highly educated on building Passive Houses.

Materials. They have been using low and no VOC finishes since the days you had to special order them. (Another good sign they know materials well).

There is not a lot of detailed information on the website about the wall assembly and design. Like all Passive Houses, they do use HRVS (air exchange). I would make sure you can find out more before committing.

You can tour their houses during their yearly tours.

13. Phoenix Haus

https://www.instagram.com/p/BpPi1p9g3hV/

Phoenix Haus is a panelized system that is Passive House certified.

Design & Materials

The Phoenix Haus Alpha System is lightweight timber frame construction, insulated with cellulose, mineral wool and wood fiberboard. The system uses solid timber supports with timber I-beams in the roof. With a ventilated rain screen on the exterior.

An airtight membrane (Intello Plus) is used on the inside of the supporting joists (behind the service cavity). Tescon Vana tape is used on joints. The exterior water-resistive barrier is Solitex.

These are all low offgassing (or practically 0), very common Passive House materials. Most passive houses use these same membranes and tapes.

They do show the cross-section of the designs, which is important information to have.

Geographical area. They can work anywhere from the Midwest to the Rocky Mountains and Pacific Northwest.

Process

Phoenix Haus does the architectural drawings, makes the panels (the panels come with windows and doors), and they deliver them to the site.

The company assembles it and helps you find a builder from their network. You can also choose your own builder.

The general contractor does finishing work (mechanical, electrical, plumbing, flooring, drywall, etc.).

They are open to working with your architect.

Year established. Phoenix Haus has been in business since 2011.

Cost. A 1,500 sq ft cabin costs about $150,000, which usually totals $375,000 with finishes, excluding land and design fees.

They have no pictures of completed houses on their website or Instagram, which seems very unusual to me.

14. BONE Structure

https://www.instagram.com/p/B7WYat5B3Mz/

This is a Canadian company that can ship the components to the US. This is a non-wood-based design that uses metal framing and spray foam. My post on insulation talks about spray foam, which I tend to avoid.

Materials and Design

They use both spray foam and rigid foam. They say they have reduced thermal bridging.

They don’t quite make Passive House airtightness standards, which seems strange to me for a house that uses foam as the only insulation product.

Process

BONE Structure will collaborate with 3rd party architects. They will go over their design with your architect.

The company will provide a project manager and can introduce you to builders, or you can find your own builder.

Time to build. On average, the envelope of a BONE Structure home of 3,000 sq ft is assembled in less than 10 days, they say.

I would have this design carefully analyzed by a building science expert before proceeding.

15. EcoCraft

https://www.instagram.com/p/Bf8joQzHvYW/

EcoCraft uses prefab building techniques, but the houses are all custom designed. They build in modules, as opposed to panels. They can be Passive House certified.

Process. They work with local architecture firms. This sounds like they don’t have an in-house architectural team.

They take care of all the building (and the cost includes this): basic excavation, an unfinished basement, walls, roof, finishes, plumbing, electrical, appliances, delivery, installation, and all finishes if you are in the Pittsburgh area.

Materials and Design. They use continuous exterior insulation (rigid foam). Like all Passive House homes, they are built airtight, with a heat recovery ventilator.

They use un-faced formaldehyde-free fiberglass batts within the walls and floors, and blown fiberglass in the attics, along with spray foam insulation to seal air leaks. (You will want to see how much spray foam is used and what kind.)

Fiberglass is a step down from Rockwool/mineral wool.

They use thermal imaging and blower door testing to test for air leakage (which leads to vapor movement).

On the interior, they use low or no-VOC paints and low or no-VOC adhesives and sealants.

Factory. You can tour the factory. You can even be there while your home is being constructed and take photos. The modules are manufactured in a factory located about 90 miles out of Pittsburgh.

Geographical area. They are based in Pittsburgh and build within a 60-mile radius of Pittsburgh. Sometimes, they build outside that radius, or you can use the panels outside of the radius, but they will not be able to complete the build.

Warranty. They carry a 10-year structural warranty and 1-year cosmetic warranty.

Cost. EcoCraft Homes start at $285,000.

16. Bamboo Living

https://www.instagram.com/p/BudE2i5HH_D/

This Hawaii-based company makes panelized bamboo homes. They have insulated walls and uninsulated wall options.

When going with a traditional indigenous building technique, keep it close to the original way of building. Bring in current experts in building science to analyze it, as well. That means no insulation for me with bamboo.

Bamboo is a traditional building material in a huge part of the world. This leads me to believe there is a way to build this in a mold preventative way.

But, bamboo being bamboo (quite the finicky material with moisture), probably means there are a thousand ways to mess this up. That means more research is needed here than usual.

I personally would not ship bamboo panels very far from where they are built.

Warranty. They give a 20-year structural warranty.

Tour: You can tour their homes. You must check out other bamboo buildings first, including a hotel made by this company, and, when they have listings, you can check out this condo made by them too.

Year Established. They have built 400 homes they say. The company started in 1995.

Cost. Base price of $89,000

17. Plant Prefab Living Homes 

https://www.instagram.com/p/BqptxXmll1F/

LivingHomes is Plant’s in-house design studio. I’m mentioning this company because it’s usually on non-toxic prefab lists, not because I’m particularly impressed.

Materials

The construction is standard. From what I can see, they use OSB, Knauf Ecobatt fiberglass insulation, and regular drywall. They use exterior rigid foam insulation, house wrap, furring strips, and Jamies Hardie siding.

They use Anderson Windows (you can upgrade to aluminum windows). Doors are by Thermatru, flooring Millstead Cork Floors (I’m not a fan of cork floors, explained here), kitchen/bath cabinets by Merillat Cabinets.

They claim to be low VOC by using 0 VOC paints and stains, millwork and engineered wood without (added, I’m assuming) formaldehyde, no wood-burning fireplaces. Vents in the bathroom—every house should have a vent in the bathroom, so this should not be their main claim to fame on mold prevention!

These materials are all very standard and any builder can build with these.

They say they include indoor plants to absorb “dangerous compounds”. This is a big red flag for me for greenwashing and lack of knowledge about VOCs, as these plants do almost nothing.

Process

They can work with your architect to create a custom design, or you can choose from one of their standard designs.

You can find your own contractor or they can help you find one.

They coordinate with the general contractor in charge of site work and foundation; they resolve any design issues and maintain oversight and quality control during the construction process. This is good: if they have this much control over the process, assuming they know what they are doing, oversight is good. A clean line of responsibility between parties is good.

Factory. All Plant Prefabs are built in their factory in Rialto, California. You can visit the factory and see your home being built. (I like this part.)

Warranty. In addition to the standard warranty required by code, they provide a ten-year structural warranty and offer double warranty protection from 2-10 that ensures your warranty will always be covered.

Geographical area. The area they serve is the West Coast of the US and “select places elsewhere”.

Cost. $438,520.00 is the estimated total price for the C6 which has 3 bedrooms and is 1288 sq ft.

So, Which Ones are My Favorite?

Top picks for a regular, conventional house are Bensonwood and Ecocor.

Top pick for something simpler, less conventional are the log cabin kits.

I have my eye on Holz and Haus.me as potentially simple elegant and unique solutions to the safe housing crisis.

Join the mailing list and Facebook page where I will share updates on the companies—which ones have worked out well for folks and stood the test of time.

Thank you!

You have successfully joined our subscriber list.

Those that Didn’t Make the List

Reasons why these didn’t make the list: Insufficient focus on building science. Evidence of poor building practices or lack of anything to demonstrate “above and beyond” mold prevention.

Don’t repeat the past with poorly made manufactured homes

Flex house | Delivered complete. The house is made with FSC certified lumber, low or no VOC materials and low Global Warming Potential. BaySeal closed-cell insulation. I’m not a fan of spray foam.

IdeaBox | These are modular homes that don’t look different than mobile homes or your average tiny home. The photos of the build appear to show standard construction with saggy fiberglass insulation. (Not good if it’s saggy).

Greenfab | Some info on green building, but insufficient evidence on advanced building science and mold preventative building.

Blu Homes | Make nods to green building and mold reduction by using wood floors and by “building well” with no actual evidence of how they build differently; how they build well; what their walls, roof, floor systems are; and how they are mold preventative. They do use metal framing, which is especially tricky to manage condensation and thermal bridging in.

Clayton homes | From what I can see from the video, it looks like an exterior vapor barrier, there is no rain screen, and the roof looks like it also has a plastic barrier. These look like typical mobile/manufactured homes.

Dvele | A new company, it sounds like they have display homes as of 2018 in California. They founded in 2016 after running a Canadian prefab company. They are Passive House certified. Use Roxul on all 6 sides, they say. They use some high VOC materials inside like epoxy. You can tour the factory. They use moisture monitors in the walls. Insufficient information on the website to make a call on this. This company might be decent, but if they are building to high standards, they should make this more obvious.

Deltec | Looks really standard. They make wall panels. Tyvek, plywood, regular framing. Not sure how those panels come together, still have to finish the rest of the insulation and everything as usual. They have pictures of what looks like vented crawl spaces (that’s a no from me), and gutters coming off the side close to the house with no kick out (that’s a no for me). I don’t have a lot of confidence in these panels, or the installation, from what I have seen.

MADI Homes | This flat pack house is beautiful and temptingly simple. But from what I could pull out of them in emails and from photos, it sounds like flash and batt insulation plus a poly interior vapor barrier (that’s a double vapor barrier). A no-no for mold prevention in my books.

IT House | I liked the IT House initially, because of the large amount of glass used, and elevated off the ground designs. The structure is metal beams. The panels which are not load-bearing are made of cement board 3form resin panels, and solid wood thin paneling (I don’t really know what that means).

Finish panels are either fiberboard cement or 3Form eco-resin (for interior wet location). I’m still confused on how they build and what the panels look like. Reportedly, they have changed the system since then. That’s why I don’t like prototypes. They have not bothered to update the website.

Their display house is a bnb. A friend checked out the display house and wasn’t totally satisfied with the construction. The website says IT House is $150/sf but a client found it to be more like $400/sf in actuality.

The company has not updated the webpage or Instagram for a very long time. A reader reported that they are still very much in business and are busy and backed up.


Concluding Thoughts

Look at the story of Greenterra homes, a company on many green prefab lists just a couple years ago—the company went down epically.

My private notes on this company said “don’t see anything green about them—external foam on metal frame, with poly on the interior, double vapor barrier (no). Laminate flooring with OSB.”

They were clearly building cheaply. It turned out to be even worse than that.

Do not rush into a prefab purchase. As tempting as it can be with all the beautiful and affordable models, and the urgency of safe housing, you have to build this right.

Prefabs are not necessarily better or worse than custom houses. They can easily be worse than most, while many are better than what the average builder can produce. A really good prefab design has benefits, mainly being built out of the rain and with fewer mistakes.

If you need to build something less expensive and smaller see my post on small prefabs.

Corinne Segura is a Building Biologist Practitioner with 8 years of experience helping others create healthy homes.

Buy Me a Coffee at ko-fi.com

This post took 30+ hours to research and write and is not sponsored or affiliated with any companies.

If you found this post helpful, you can buy me a coffee to support the research behind this blog. Thank you!


Thank you to Bethany from Building Literate who contributed as a researcher to the post.

a banner advertising posters for sale. it says "20 printable posters for a healthy jobsite, buy here" it shows examples of 4 posters. click anywhere on the banner to go to the store to buy it.

Filed Under: Healthy Building, Mold-Free Building Tagged With: Healthy building, mold prevention, tiny homes and trailers

Designed for Mold-Prevention – Corbett’s Tiny House

January 15, 2020 by Corinne 3 Comments

building a high performance mold preventative tiny house

This post contains affiliate links. Upon purchase, I earn a small commission at no extra cost to you.

Intro

Corbett and Grace Lunsford’s tiny house on wheels (THOW), called the Tinylab, was made as an educational house to teach folks about home performance.

In this article, I’m going to outline the areas of this tiny house’s home performance that are relevant to mold prevention.

These mold preventative aspects of the house are:

  • Air sealing to prevent vapor from entering the cavities of the enclosure.
  • Using vapor retarders wisely, to prevent condensation in walls and the roof.
  • Insulation installed without significant air leakage (air leakage = vapor movement = condensation potential).
  • Windows flashed and taped correctly to prevent water infiltration.
  • Using ventilation to reduce humidity, and avoid negative or positive pressure which can push or pull air through the walls and cause consequences.

I also outline some other facets of the house that make it a healthy home. These are:

  • Low VOC materials
  • Improving indoor air quality by reducing carbon dioxide, carbon monoxide and VOCs
  • Controlling humidity
  • Managing microbial growth in tanks
  • Energy/Power system which provides for flexibility of location

I haven’t seen many tiny homes on wheels built really well. This is only the second one after Terran’s house that I have featured as a mold preventative build.

Air Sealing is Key

In Corbett’s High Performance house, air sealing is incredibly important. Air sealing is how you prevent air from entering the wall and other cavities. This is important because air carries vapor, and it’s usually at a different temperature.

Air leakage brings with it vapor that can condense on hidden surfaces.

This build used materials that are made for Passive House design. Passive House is a design process that includes a major focus on controlling for moisture and condensation within the walls, ceiling, and foundation.

The Exterior Water Resistant Barrier (WRB)

Solitex Mento membrane and tapes were used, just like in this detailed example.

Solitex Mento is a breathable house wrap/WRB that comes with a line of high-quality tapes for sealing around all seams and openings.

Most houses should have a breathable exterior water-resistant barrier over the sheathing, with a vented rainscreen system. A rainscreen is battens that create a gap behind the siding. This lets moisture escape and dry out.

These products are good at air sealing and they are also lower VOC than liquid applied barriers. Many high-quality builders are now using liquid applied barriers in many areas of the house, and that might not work for all chemically sensitive folks.

Interior Vapor Retarder

Inside, the Intello brand smart vapor retarder was used to prevent moisture from entering the cavity in the winter and let it breathe more in the summer, preventing condensation within the wall cavity.

We want to get away from using vapor barriers that trap moisture. Instead, these two permeable membranes, one on the outside of the wall and one on the inside, control air flow, and slow vapor flow but don’t stop it completely.

The Insulation

With Rockwool R 15 in walls and ceiling, the Tinylab house can be moved around the US to multiple climates. You always want to design the house with one climate in mind to optimize all the systems (and the whole house as one system).

This house was built for Atlanta. As they moved the country they had the most difficulty with humidity and condensation in very humid and very cold climates. They attempted to follow the weather to reduce this challenge before returning to Atlanta.

Rockwool is easier to pressure fit into cavities compared to cotton batt. They tried the recycled blue jean insulation at first, but it was sagging in the ceiling, and leaving a little bit of air gap in the wall cavities. You can see that here.

Rockwool holds itself in well with a friction fit in both the ceiling and the walls, without sagging and leaving air gaps. The tighter it is to the framing the better.

If your insulation is not tight to the framing air leakage can lead to moist air moving through the wall and condensating. A lot more moisture moves into the wall with air leakage than with diffusion. Diffusion itself moves very little moisture, not enough to cause problems in a well-designed wall. Matt Risinger explains that in this video.

You need to take your time to cut and fit the insulation as perfectly as possible so that you don’t have air leakage.

They didn’t use spray foam, even though folks like the idea of insulation that in theory is an air sealant and a high R-value insulation product in one.

In reality, spray foam often pulls away from the walls, in which case you lose the air seal. And in a tiny house on wheels that is moved around, it’s going to crack and come apart from the studs almost for sure. Bad idea.

Here is the interior air barrier and air sealing:

Low-VOC Materials

There was a big focus on 0 and low-VOC materials throughout the whole build which I appreciate seeing, even though the Lunsford family is not chemically sensitive.

Walls and Cabinets

Purebond plywood which is made with a “soy glue” (probably a polyurethane glue) was used for the interior walls and cabinets as well as the interior door.

If you are sensitive you should test this out for yourself. I prefer plywood made with phenol-formaldehyde which has a defined short period of offgassing before it cures, compared to an unknown glue and VOC that we know less about.

For the walls here I would have preferred just a solid tongue and groove wood. With plywood only used for cabinets.

Flooring

The floor is APC Cork, which looks awesome and is great for sound dampening. For most moderately to severe chemically sensitive folks, cork flooring is too high in polyurethane glue (and VOCs).

There are many similar floors you could put down in a tiny house that are extremely low (lower than this) in offgassing. I list them here in my flooring post.

Insulation

Both Rockwool and EPS (polystyrene) foam insulation are used in the house. Both healthy choices. Rockwool is my go-to insulation to consider before moving on to more unusual options.

My insulation post goes more in-depth into insulation choices and why rigid foam is still a good choice for most sensitive folks.

Rigid foams are frequently used as exterior insulation (outside of the framing) as part of the system design to prevent thermal bridging and to help prevent condensation.

This video has some good information on the insulation:

The Devil is in the Details (Like Window Flashing)

When designing and building a mold preventative house, the devil is always in the details. Flashing is an area that is more often than not done wrong on new builds (along with the air sealing layers like the house wrap).

I liked this detailed video below on how to properly install a new window to prevent future moisture issues.

Maybe this looks simple and like anyone who can follow instructions can do it, yet almost every builder makes mistakes here.

It’s rare that I see a build in progress with the house wrap/WRB and all flashing done right. You should supervise this part of any build.

When windows and other openings in the exterior are not detailed right, water that gets behind the siding finds its way to the plywood or OSB sheathing. Enough moisture will cause water damage and mold here. As damage continues it will get into the framing and wall.

In regular builds, other openings in the wall for vents or wiring are often left without any sealing (flashing)! Big problem for water and air getting in.

Water is expected to sometimes get behind the siding – that’s not a fatal situation. It’s supposed to be able to drain, dry to the top and bottom, and stay out of the walls.

The windows are Pella brand wood windows with aluminum cladding on the exterior. The caulking recommended for this combination of materials is DAP 3.0 Window, Door, Trim & Siding High Performance Sealant.

Here are the WRB instructions from 475 if you prefer diagrams to video. All the brands come with detailed instructions, there is no excuse for a builder to not know how to do this.

Exhaust and Ventilation

What Happens if you only have Exhaust Fans

The object in the Tinylab is to have active balanced and controlled ventilation.

It’s easy in a tiny house to create negative pressure with a high CFM (CFM is the amount of air it’s moving) bath fan or range hood. This pulls way too much air out for such a small space. This can happen in any well-built air-sealed house, but it’s exaggerated in a small space.

The problem with that is that you start to pull in air back through any gap that the air can find a path through. And back through places you don’t want to pull through – like exhaust vents or even the composting toilet in this case! You might also be pulling in moist outside air.

You aren’t getting healthy make-up air this way (which is the air that’s coming in to make up for that exhausted air).

Why you want Air Moving In and Out

Without enough air exchange (air coming in and going out) in a small space, you can also raise your carbon dioxide.

Having air exchange (meaning you replace the indoor air with fresh outside air in a controlled way) is the best way to reduce carbon dioxide, VOCs and other pollutants, like those produced by a gas stove.

This house has a number of high tech ways to manage the air quality and replace the air.

An Energy Recovery Ventilator

A Broan HRV (later switched out to an ERV) exchanges indoor and outdoor air in a balanced manner. The ERV is working better for them in their climate because it buffers both humidity and temperature.

You need to look at the house as a system and your climate to determine which one you need.

The negative air (exhaust) side of the ERV is venting out of the bathroom, and the positive air (incoming air) is coming in over and under the loft.

The fresh air comes into the loft area with a damper to control whether it goes down to the sleeping area below.

This video explains what an ERV and HRV do and what the difference is.

Exhausts and Make-up Air

The composting toilet and kitty litter box area has a 3 CFM exhaust vent to keep that air moving out (a very small fan, just enough to keep it moving out).

The gas stove has an exhaust fan venting out over it, to pull out moisture, carbon monoxide and other pollutants and particulates from cooking. When this fan kicks on, it opens up a damper that brings in fresh air right under the stove. This keeps air circulating and moving out right where you want it to.

You can see it in action here:

Monitoring the House

The house has a number of cool monitors that help you know that everything is functioning as it should be.

Carbon Monoxide

Defender brand low-level Carbon Monoxide monitors detect low levels of carbon monoxide. This is important if you are running appliances on fuel. Your carbon monoxide level should be 0 in a healthy home.

Elderly, children and those with compromised health are more affected by low levels of carbon monoxide. The cheap monitors are only going to show you when the level is already too high.

Radon

Corbett has a radon monitor from Trutech tools, which is useful in a regular house. Though here it is used for teaching purposes. If you are not on a foundation you don’t need a radon monitor. (Though if you have a granite countertop this might be interesting to see!)

Corbett is aiming for 0 radon in all his houses.

C02 & VOCs

The Foobot monitor tests for carbon dioxide (what you breathe out, this will show you if you have enough fresh air), VOCs, particulates, temperature, and humidity.

Pressure

Retrotec manometer measures the pressure inside, making sure it’s where you want it to be. In the Tinylab they are making sure it’s more or less equalized.

It also monitors the pressure of the incoming air through the ERV. Just an extra data point to show Corbett that everything is functioning, and for educational purposes. For most people, this extra step would not be needed.

Though it would be interesting to see the pressure in the house as a whole. Just seeing that would tell you if something is wrong with one of your fans or exhausts.

Temperature

Two Dwyer temperature gauges measure the temperature of the incoming air through the ERV, and the air inside the wall on the backside of the insulation. These show how well the house is managing the temperature.

The temperature gauge on the inside of the sheathing can help you to calculate if there is a risk of condensation on the sheathing or exterior vapor barrier (if you have an exterior vapor barrier). Especially if that is coupled with air leakage (which you can use an infrared camera to check for).

A third gauge wraps around a plumbing pipe under the stove to see if there is a chance that pipe will freeze. Smart!

Mechanicals / Systems

Greywater & Blackwater

The greywater tank is on the exterior and is portable and on wheels. I like this idea as you don’t have and scum build-up inside hidden tanks. And not having a blackwater tank definitely cuts down on the kinds of bacteria and mold you might be fermenting in your tanks. (They use a composting Air Head toilet instead).

Freshwater

The freshwater tank, stored inside under the sink, won’t freeze. It uses chlorine to keep it bacteria and fungi-free, it’s not for drinking unless you want to filter the chlorine out.

In the last section, you can see the major leak they had with this tank and how they put more precautions in place after that.

Fuel & Electrical Systems

They have three solar panels that are portable, on a long cord and are set up on the ground. They can be moved around to maximize sun exposure. It’s not a great idea to put panels on the roof; more holes = more chance of leaks there.

You can also plug the house in; the whole house runs on one extension cord that runs off a regular house outlet (15 amps). That is an impressive (low) amount of power usage. It gives you the ability to be super flexible with where you live. Either going off of solar and propane, or one plug into any house.

The stove and hot water heater run on propane, which cuts down on electrical usage.

The Mitsubishi mini-split only needs to produce 5000 BTU of heat, 4000 BTU of cooling to keep this house warm and cool enough for their climate. It runs off only 200-300 watts.

This is something you need to calculate in at the design stage. You don’t want an oversized or undersized system.

Mini Split heat pumps are ductless systems, they do not bring air in or out of the house.

This does a little bit of dehumidifying, and in some conditions, the ERV helps too. But they also found they had to add this desiccant dehumidifier.

This video shows the mechanical systems and is a good overall tour:

Design of Walls, Ceiling, and Floor

Floor Design

The base of the house was designed to use the trailer cavity as an insulation cavity. EPS foam with foil backing was placed in between the metal trailer joists.

Underneath the whole trailer, there is a metal barrier to prevent water from splashing up. There is no thermal break underneath the metal trailer framing. This is a typical design for tiny homes on wheels.

On top of the framing, plywood is placed against the metal. It looks like there might be a slight gap between the EPS and the wood.

I wouldn’t recommend this design of the floor system in terms of preventing condensation and mold.

In fact, the flooring system is where you should put the most thought and planning. Bring in an architect like Cheryl Ceicko, or Passive House designer like Mike Maines.

It’s easy and common to have condensation in the flooring of a tiny house on wheels. The metal trailers make this difficult. There is a lot of thermal bridging. You need to decide between thermally breaking this underneath with foam or building up a breathable system on top.

Those who have designed with mold prevention as the main goal have all built up on top of the trailer. This post shows a detailed example.

EPS is also used around the metal wheel wells, a place that is prone to condensation.

Roof/Ceiling

The roof has plywood decking with foam exterior insulation on top (1 inch EPS), then Solitex Mento, then a rainscreen, then 26 gauge metal roofing.

Walls

The walls are regular 2 x 4 framing with Rockwool, plywood sheathing, a rainscreen, and is breathable to both sides with the Solitex and Intello products.

Make sure your rainscreen is vented, it’s a tricky detail in tiny houses on wheels.

What went Wrong?

A Flood

The Freshwater bladder did leak and it was quite the flood. After that, the Lunsfords put some precautionary measures in place.

Anyone preventing mold would want to do this from the start, making sure a leak-prone area is a waterproof protected area and you have these leak alarms.

Mattress on the Floor!

The foam mattress was put right on the floor. Always a no-no! This causes mold underneath. They changed over to an air mattress which does not let moisture transfer through it.

Condensation in Storage

They also had condensation on the wall in the backside (at the back of the drawers that were full of clothes and things) on the really cold days. That’s a place to keep an eye on. You may even want to design your storage a little differently in a cold climate.

Realistic Expectations

Corbett doesn’t have unrealistic expectations on how long a tiny house will last. He says no more than 30 years.

They put a lot of miles on the house but it was designed with an engineer to make sure that it would hold up to those forces. In that sense, it was designed well for the motion.

Building a tiny house when you have sensitivities is in a way a trickier endeavor. You are in a much smaller air space with all the items that offgas that you can’t avoid – appliances, flooring, caulking, glues, windows, doors.

You are also in a much smaller space with EMFs and you cannot get away from that.

In the end, I still like tiny houses for those with mold and chemical sensitivities, but only if you know full well what you are going into and have taken the time to design a detailed mold preventative build.

There’s a lot of work involved here – you are designing a full system. Just about as complicated as a regular-sized house.

The only part that is easier due to the size is that you have an easier time supervising the build. The HVAC is also less complicated.


I am currently taking Corbett’s course in Home Performance to become certified with the BPI as a Building Analyst. Corbett consults on home performance, and you can contact him here.


Corinne Segura is a Building Biologist Practitioner with 8 years of experience helping others create healthy homes.

Did you find this post helpful? If so you can buy me a coffee to support the research and writing behind this blog. Thank you!

Buy Me a Coffee at ko-fi.com

Filed Under: Mold-Free Building, Tiny Homes and Trailers Tagged With: Healthy building, mold prevention, tiny homes and trailers

Tiny Homes & Shelters for the Mold & Chemically Sensitive

September 4, 2019 by Corinne 33 Comments

Related posts:
1. Regular-sized non-toxic prefab homes
2. Mobile homes on wheels for those with sensitivities
3. Emergency shelters for those with sensitivities

Simple, Small Modular and Custom Homes for those Sensitive to Mold and Chemicals

These are small and tiny houses (not on wheels) that are suitable for those with extreme sensitivities to mold and or chemicals.

Not all materials will work for all folks, that is why this article features everything from all wood, to all plastic and all metal homes.

I have natural materials on the list as well, like hemp and concrete.

These small houses are ideal to create a healing space away from conventional housing that is so prone to problems.

This post contains an affiliate link to a home sold on Amazon. This home was on this list before they starting selling through Amazon. Upon purchase, through affiliate links I earn a commission at no extra cost to you. This post is not otherwise sponsored by any of the companies.

1. Passive Home Tiny Homes

https://unityhomes.com/our-designs/nano/

Besonwood is a high-quality passive home custom prefab company. Their custom Thoreau Cabin home is 150 sq ft. The owner chose the stone facade but that is not a typical facade. They are custom homes so they can build any size.

Their predesigned wing is called Unity Homes. Their smallest house “Nano” (pictured) is 477 sq ft.

They are wood framed with passive house design, made to high standards. This would not work for those extremely sensitive to offgassing as their walls include OSB and engineered wood framing.

The insulation used is Rockwool and cellulose in the model I saw (they have different wall systems to choose from).

This is a house that mold sensitive folks should consider due to their high-quality design, high-quality factory-built, and indoor factory conditions. This is at the top of my list for a reason, I would build with this company.

You still have to have planning and supervision on the site prep, foundation and the installation of the prefab components. Every detail matters for mold prevention.

2. All Wood Prefab

Photo Here: https://www.instagram.com/p/B0WFlacAU-2/

The Holz100 homes come in all sizes from very very tiny, small and large.

The walls, floor and ceiling are all wood, no glue, no nails. The roof will not be all wood, there will need to be another roofing material there.

I have a more in depth review in the general prefab post.

I think this house is very promising but needs more investigation. If you tolerate wood there is nothing else in the interior.

To hit codes you will need to put exterior insulation on it. Exterior foam insulation would also be a fool safe method to prevent possible condensation within the air pockets of the wood wall. That is how I would detail it for mold prevention. This would make it quite pricey.

3. Wooden Treehouse

From Out N’ About, a company that rents out treehouses, sells plans and parts, this 16′ Treezebo Hexagon could be a great non-toxic home.

The plans for the treehouse includes a 3-hour consultation.

I like this simple option if you don’t need insulation. Using a rot-resistant wood and no need to worry about the foundation type simplifies everything here.

This can be a mold preventative option.

4. Arched Cabins

The basic kit for Arched Cabins includes floor plates, ribs, ridge beam, standard R13 insulation, Super Span Roof Paneling, trim, and fasteners needed to assemble the cabin.

Arched Cabin kits do not include the foundation, installation, interior, end caps, delivery.

What I like about arched cabins is that there could never be any leaks with this one-piece roof/siding.

In this design, you can use spray foam insulation (with or without rigid foam) without worrying about exterior leaks getting in behind. Spray foam, while it does offgas, is a vapor barrier and the best bet for insulating metal walls in heating climates. It’s risky though to use anything with an exterior vapor barrier (no rain screen) in a heating climate. Spray foam could pull away from the skin. Plus spray foam off gasses too much for chemically sensitive folks.

Either closed cell (2 part) spray foam is used to form an airtight vapor barrier in any climate where you heat, or not quite as foolproof is rigid insulation installed with canned (1 part) spray foam).

This could work for preventing mold, but I don’t think anything with a metal exterior is a good idea in heating climates, it’s far too dependent on spray foam holding up perfectly or a plastic barrier holding up perfectly. I would not risk that myself. And I would not use anything with an exterior metal or fibreglass vapor barrier in a heating climate myself.

The large overhangs are also superb protection from rain over the windows and doors on the ends.

The 12×12 kit is $2400. This is a simple, mostly metal kit that you could then customize to be chemical-free on the inside. 

You can see a video tour here and you can check one out on Airbnb.

5. Plastic Domes

These cool Intershelter domes are easy to transport and assemble and have a lifespan of 30 years.

The larger domes are made of a fiberglass composite material that the company says does not emit an odor. Some sensitive people say fiberglass needs some time to offgas (1-2 years or more) and others find it OK fairly soon after production. 

The small domes are 14 feet and are made of ABS plastic, which is a really safe plastic (the same plastic the LEGO is made of). This one they say has an integrated foam component.

I would look closely at the details on the panels that have integrated foam. You would want to make sure this is not likely to leak.

If this is done well this would be much easier than trying to put foam insulation on the inside of the one-panel fiberglass domes yourself.

The integrated foam would be ideal for heating climates (cold climates).

Installing foam in the larger domes with an exterior vapor barrier is not simple in heating climate. If you are in a tropical climate this might be ideal.

6. Plastic “Lego” Home

EverBlock makes plastic blocks that fit together like lego. You can make a simple structure out of these.

It’s a safer plastic than fiberglass that is much more tolerable for the chemically sensitive.

7. Plastic Module Homes

coodo.com

There are a few designs that are using metal framing with a plastic body. I find this design extremely promising.

The Coodo above is made in Germany and can deliver all around the world.

A similar company, AluHause is American, with a show house in Palm Desert.

The downside is that fiberglass does offgas and won’t work for many sensitive folks, at least not right away.

Both have the potential to be very waterproof and mold-resistant designs. Neither one gives too much away on how it’s built exactly, so we cannot evaluate it in great detail.

Just like when looking at larger prefabs you have to go through the reconnaissance process outlined here.

Another similar model is the Haus.me which I go into more detail on in the prefab article. This one looks to be a different type of plastic, not fiberglass, though they don’t say which type. They claim that it doesn’t offgas.

Photos here: https://www.instagram.com/p/B1916GAIsFr/

8. Simple Wooden Cabins 

Solid wood very basic wood cabin


Leisure Cabins bare bone wooden cabins are made of solid wood. I see some OSB in the subfloor but that could be avoided. Opt for solid wood for the roofing as well.

There is no insulation so they would be difficult to live in in extreme temperatures.

It does not include roofing shingles and roof prepping, stains, railing, foundation, and deck or windows. You do your own wiring, plumbing, and systems as well.

This version is a thin wood wall, not very warm. And when you start to insulate something like this you start to get into a complicated design (I would not recommend insulating anything that does not have a rain screen).

In that case, I would prefer to go back to a prefab like the Unity Homes on this list which already has a well-thought-out wall system, or even design a house from scratch.

Trying to make one of these kits work with insulation is working backward from a plan that won’t likely come together in a mold preventative way in climates where heating is used.

They are produced in Canada. 

Amish Built Wood House

From Backyard Buildings in Maine, these tiny houses are a good deal. They are custom built. This one pictured is from a member of the EI groups on Facebook and I have her permission to post about it.

The house is made of local wood, non-fiberglass insulation, low VOC adhesives, a woodstove (but you could use electric heat), wired for on-grid (but can do off-grid as well), cedar siding, metal roof, and plumbing.  

This does become a complicated system to design when you add insulation.

When I tried to work with this company, it was difficult to communicate with the builders (because of lack of technology/being Amish). They were mixing some traditional building with some more modern techniques like adding exterior foam insulation and in my opinion it is not mold-safe or detailed right.

They can be moved though they are not on wheels.

When buying a shell you also want to make sure it has a vented rainscreen if you are going to insulate it, otherwise you won’t be able to build that out properly.

It’s not likely that the rainscreen, WRB, and window flashing in done right in these Amish shells or full builds that I have seen. I would not personally go with or recommend this option.

A Traditional Log Cabin

https://www.montanamobilecabins.com/projects-updates

For a thicker wood wall look at a company like Montana Mobile Cabins. This true round log cabin does not use insulation.

I much prefer this simple design than to try and insulate a wood-framed cabin. This is a much safer bet for mold prevention.

It’s not perfect as I have heard of condensation in log cabins, I would consult with a building science expert on how to make this work in your climate.

Prefab Square Log Cabins

Photo here: https://www.instagram.com/p/BJi5A7SgtDQ/

I like the thick square logs too. I like that they would fit together well. In theory, this might create a more airtight assembly which might help prevent moisture and condensation issues.

Confederation Log Homes above makes custom prefab log homes with square-cut logs. The company has been around for a long time.

This is the first log home company I would look at due to their extensive experience.

9. A Metal SIPS House

The Nomad Cube 

The Nomad Cube is a promising little metal SIPs house. It can be built out to be very non-toxic.

Metal SIPs make up the main walls and roof of the house and are made from laminated steel-EPS white styrofoam-steel. They are essentially 0-VOC and extremely resistant to mold as long as the panels stay laminated together and assuming there are no leaks into the panels.

The smaller Nomad Micro has been redesigned since I originally wrote this. That one is no longer a SIPS house. Also be sure to ask about and eliminate wood in the structure.

The Nomad Cube is 13 x 13.

You need to add: shipping (From Vancouver BC), platform/slab/or piers, installation, wiring, heat, plumbing, hot water heater, roofing membrane, interior walls, baseboards, shower door, ladder/stairs, fridge, range, and hood vent.

My most sensitive friend tested the SIPs and thought they were good. It is possible to complete the interior with non-toxic materials.

The basic design of this house is metal framing with metal SIPs. It appears in one of their videos that there is plywood in the base, which I would change.

You will need to have a building science expert review this design and help with the details along the way.

I consider this one of the most promising designs here. It’s the first option on this list I would look into for something really small and simple.

Metal SIPS homes work really well for mold and chemical sensitivities.

Make Your Own SIPS House

You can also make your own SIPS house easily and fast. This one below is made with Structall Building Systems panels. Another brand that I have seen sensitive people use is Permatherm.

These are also metal-EPS foam-metal and have an internal locking together system that allows them to quickly snap together.

In this design the panels are fully structural elements, there is no additional metal framing. The panels make up the walls and roof.

To create a long-term structure you would use siding on top of the SIPS and pour a cement slab to the same standards that you would use on a house.

But quick and dirty, you can throw up these panels fast and get away without siding if you don’t need it to last forever.

This is the fastest and safest (for both mold and chemical sensitivity) option on the list.

Art Span Inc

While I have no problems with the two above, I really like this Canadian company Art Span that makes Sip panels. It can be difficult to source the panels from the companies above and this one is easier to buy from.

They also have a couple of simple designs that are already kits. I like the little ice shack as well as the little houses.

I have a friend that built one and liked it.

Review of Boxabl SIPS House

The company Boxabl has created a metal SIPs house that has caught a lot of folks’ attention.

The main reason it has gone so viral is that it promises it all – fast, easy, cheap, resilient, and healthy.

First, is it good for chemically sensitive folks?

Yes, the basic structure of steel/foam SIPs is very safe for those with chemical sensitivities. That part has practically no offgassing.

They also use MgO board on the interior surfaces which is generally safe for most people with MCS. It’s not clear how that is attached, it’s likely glued on, which could be a problem for offgassing.

The flooring appears to be glue down vinyl, though they have described it in different ways. The countertops and tabletop are laminate. And the interior cabinetry is conventional. These three elements will contribute to offgassing of some VOCs, plasticizers, glues, and formaldehyde.

Is it a mold preventative design?

In general, metal SIPS are very resistant to mold because as long as the wall remains laminated they are immune to condensation problems. The waterproofing will depend on how well the seams are connected.

There are a number of concerns I have with this house:

  • There is a clear negative lap at the bottom of the first piece. It’s not just an exterior trim detail, it’s integral to the design. I don’t see how you would not always be battling water pooling up and soaking the wall.
  • It’s nice that it unpacks quickly into a full livable house but how are all those seams waterproofed? I do not think we have enough information on that right now.
  • Because it’s done almost entirely in a factory we would need to see a detailed factory tour to see if this is a good design. There are so many details I would want to see including how the windows and all seams are waterproofed.
  • The house, like all prefabs, needs to be seen in person, especially during installation to see if there are any vulnerable to water areas.
  • MgO and steel have not gone well together in the past. In Denmark, massive problems were caused when salts naturally leached out of MgO and corroded the metal in the buildings.
  • The website says that Boxabl “doesn’t use lumber or sheetrock” and in an email they said “we do not use wood or materials that can rot or mold”. But in multiple videos, wood appears to be the framing of the edges of the SIPs. Hidden wood in a metal-based house is a problem in my books.

For more thoughts on this prefab I have a post on this company.

EcoSteel

Ecosteel homes are made of metal-foam SIPs, but this company uses polyurethane which usually has a little bit of offgassing (from the foam, blocked by the metal but it could come through at the seams).

They have a one bedroom that is already designed. It’s 165K which only includes plans and panels.

10. Hemp House

Hemp House Pods – a simple 8 x 12 structure meant to qualify as an ADU (without a permit) is made from hemp and a wood frame. Hemp may be mold resistant in certain climates. I would likely only use this in dry climates. My post on Hempcrete has more info.

I would have this reviewed just like all the others. I would use huge overhangs and I would look more closely at a foundation type that does not wick moisture up.

The cost does not include plumbing, electrical, or the deck.

They say they go up in a week.

11. Concrete AirCrete Dome

https://www.instagram.com/p/Bq2ydnqHspm/

I reviewed the AirCrete dome for mold resilience and I have a few thoughts on it. (Note this is different from AirKrete with a “K” insulation, though it’s a very similar material).

AirCrete domes are made of a mix of concrete and a foaming agent. You can use a natural dish soap like 7th Generation.

They were originally used in tropical settings and I do think they might this is simpler in climates that don’t require heating.

Mold Preventative Design of the Roofs

I do not like any of the designs that have multiple domes coming together creating valleys where water will not drain well. In some designs, debris is even accumulating in those valleys. I would only do single domes with as steep of a slope as possible.

No valleys where water and debris collect and soaks in. This is always best practice for mold prevention in houses.

The steeper the slope the better it will shed water.

The Challenge of the Exterior Coating Creating a Vapour Barrier

The exterior is coated with waterproof exterior stucco and then acrylic or similar concrete sealer.

The coating would have to be waterproof which creates a dilemma in heating climates.

If it’s waterproof then it is usually an exterior vapor barrier, which can cause condensation and mold in climates where heating is used. This is fine to use in climates where only cooling is used.

I might put this whole structure under a second roof, like a carport (or a souped-up metal roof like this house has). That way you don’t have the conflict of the need for a waterproof but also breathable sealant on the exterior of the dome.

You may also consider a sealer that sheds water but is breathable – a layer of concrete stucco sealed with sodium silicate might work. Just like polished concrete which is vapor breathable but should shed water. Consult with a building science expert to work this out.

Can Concrete go Moldy?

Conventional wisdom is that concrete cannot mold because it’s not organic. As a mold-sensitive person, I would say every basement, most slabs, and almost every concrete building in the tropics shows otherwise.

Mold can grow in anything porous, I have found.

Slab Must be Detailed Right for Mold Prevention

It’s also incredibly important to detail the slab right for mold prevention. Slabs are very prone to going moldy in all climates and are rarely detailed properly.

Because slabs are made of concrete and the dome is concrete you also have to take extra precautions with the slab and site details to not have wicking up of water from the ground up through the structure. This could easily happen in rainy climates.

The final flooring over any slab also needs to remain breathable to the inside in best practices for mold prevention. If the slab does take on water through wicking or through water coming in through the sides it needs to dry up.

Only polished concrete, tile (including stone tile), or earthen clay floors should be used as the final floor.

Does the AirCrete Dome Work for Extreme Chemical Sensitivity?

I think this dome would work for many people with MCS.

Admixtures are used in the concrete, you would want to check those out.

The foaming agent can be a non-toxic soap if you tolerate one of those.

The interior can be finished with natural plaster which does not contain additives.

The exterior finish needs to be looked at carefully, synthetic stucco might not work for everyone who is chemically sensitive. That won’t work in most heating climates anyway. Sodium silicate is considered safe for the chemically sensitive.

The slab would have the same concerns as all slabs. You don’t have to use rigid foam in the slab in many climates, but you do need a thick vapor barrier like Stego. It needs gravel underneath and proper grading.

A polished concrete or tile floor works well for chemical sensitivities.

You can find the workshops and the tools needed to create the concrete foam mix at DomGaia.

12. Container Homes

I have not been a fan of container homes in the past because the exterior metal envelope creates a really tricky situation for condensation in every heating climate.

More on that below, but if you are somewhere where you only use AC or no heat or AC this can be just fine.

When I saw that a company is making exterior insulation for shipping containers this changed my mind on the topic. The foam contours to the container and insulating it on the exterior eliminates the condensation issue.

You will still have to detail around the window and doors, and make the steel envelope airtight (I would try to weld all seams) but I really like this idea.


A Note on Exterior Metal and Fiberglass Shells and Mold Prevention

A prefab house that has a metal or fiberglass shell that does not have a rainscreen system is extremely difficult to insulate in most climates where houses are heated. This includes container homes.

“In a cold climate during the heating season, moisture vapor inside a building is driven outward into exterior walls. When it reaches a surface that’s below the dew point, the vapor condenses into a liquid.” (source).

In this case that “surface” where moisture in the air condensates is that metal or fiberglass shell.

To try and work with this problem you need airtight insulation. This could be 2 part closed-cell polyurethane spray foam insulation. This offgasses too much for most people with chemical sensitivities. It also causes the challenges of exterior leaks going undetected. Arched Cabins has a nice design because there are no seams or permeations. The challenge here is when spray foam pulls away from the metal or fibreglass.

The second strategy is to use rigid foam insulation and make it airtight. This is also tricky. Foam can be taped or sealed with caulking or 1 part canned polyurethane spray foam, but it’s difficult to keep it airtight. And any gap of air behind the foam can have air with enough moisture to condensate in some climates.

Mold Preventative Design

Options:

  1. In heating climates, it’s easier to have a well-designed wall system that has the proper air barriers (likely no vapor barrier), and a rainscreen – in short, built like a regular house with all the complexities of the wall system but with great attention to design and execution of detail.
  2. A monolithic wall – I tend towards simple buildings that have fewer areas where mistakes can be made. Monolithic walls (a single wall, made of one solid material) is easier in this sense. Log cabins, solid concrete walls, and solid earthen walls are examples. This doesn’t mean they will work in any climate and are foolproof. You still need a building science expert (like an architect) to design the system as a whole and make sure that the wall type is properly designed and executed and well maintained.

Corinne Segura is a Building Biologist Practitioner with 8 years of experience helping others create healthy homes.

Buy Me a Coffee at ko-fi.com

Did you find this post helpful? If so you can buy me a coffee to support the research behind this blog. Thank you!

Filed Under: Healthy Building, Mold-Free Building, Tiny Homes and Trailers Tagged With: Healthy building, mold avoidance paradigm, mold prevention, tiny homes and trailers

Converting a Cargo Van – Mold Preventative Low-VOC Design

June 28, 2019 by Corinne 24 Comments

This post covers converting a cargo van into a camper for those sensitive to mold and chemical offgassing.

I will focus only on a few key areas:

  • Insulating a van in a way that will not go moldy – as metal walls are the trickiest material to insulate because of the condensation factor. Most vans are built wrong and have mold (or will go moldy).
  • Low or zero-VOC healthy materials for the walls, flooring, cabinets, and interior.
  • A bed platform and keeping the bed dry and mold-free.
  • A few appliances that are recommended.

Building a camper that will be both mold-free and chemical-free is tricky!

Keep in mind a cargo van can be anything from a metal box with a bed to a fully decked out camper with a stove, fridge, sink, heater, AC, and even a full bathroom.

I recommend all of the products here, some products have affiliate programs and some do not. Upon purchase, I earn a small commission through affiliate links at no extra cost to you.

Insulating a Cargo Van to Prevent Mold

The most important aspect of creating a mold-free camper is the insulation.

Here is the key point: no water vapor can enter the wall cavity, in most heating conditions, this means no air can enter behind the insulation.

With exterior metal walls, as soon as you are heating the van to the point where the exterior wall will hit dewpoint, you have a serious risk of condensation and mold in the walls.

So again, to keep it simple, no water vapor and no air can enter the walls if you plan to heat your camper when it’s cold.

Ideally, no air at all should be trapped behind insulation if you want to be extra careful to prevent mold.

If you are in a hot or tropical climate where you don’t heat you will not have this problem of the exterior metal causing condensation.

Rigid Foam Insulation

Camp Like a Girl, a book about converting a van, had a number of flaws and misleading instructions.

The writer uses some XPS and some EPS insulation. XPS is a vapor barrier (meaning no water can pass through 1.5 inches), and EPS is not.

Using XPS foam is one option to insulate your van. XPS or polyiso with foil backing are usually tolerable for most people with MCS.

However, just the foam on its own will not be airtight. You need canned spray foam to fill in the gaps if that is tolerable for you – the thorough system to prevent mold that is working in vans, and was reviewed by a top building science expert, is to fill in the area behind the foam with spray foam and squish it in, leaving no air behind anything.

You need to fill in all the crevices that are not big enough to take rigid foam with spray foam as well.

One part canned spray foam is not chemical-free, but I have found it odorless once cured. You will have to see if it works for you if you are sensitive to chemicals.

Handi-Foam is the safest one, as it is GreenGuard Gold certified. Great Stuff will work for many people. This method involves a lot of canned spray foam.

You can also buy one-part in larger quantities, I am currently testing out this DAP liner to attach foam to walls. They claim this is closed cell foam.

The rigid foam also then needs to be riveted to the frame.

I would not recommend the method in Camp Like a Girl of putting in EPS and not sealing it – this leads to condensation. Because she barely heated the van, and had hot temps in the day, this did dry out in the day and did work in those conditions.

Any foam with air behind can be a problem when heated. Breathable insulation is even more tricky. A few cold days in a row and this will start to be a problem. (I would never use wool insulation in a van, the only exception is very hot climates where you will never be heating the van).

A good way to go about it – if it’s warm enough – is to sleep in the van empty and slowly work on insulating and building it out. The other option is to get it all done and then wait for it to offgas. 

Rigid Foam in the Bed

Some have used insulation in the bed platform to keep the bed warm. I would be concerned here with flame retardants in the foam, and putting a bed on a flat surface is a no-no for mold.

In the bed section, I discuss how to use insulation under the mattress without causing moisture and mold.

Spray Foam Insulation

Spray Foam without any rigid foam is, in theory, your safest bet for preventing mold. The foam will get into every crevice and form an airtight layer that will prevent all moisture from getting into the walls. 

Two-part spray foams are much riskier than the one part canned spray foam discussed above.

The best spray foams are Heatlock Soy line at Demilic and Icynene Proseal (both GreenGuard Gold) (closed cell). Both are polyurethane foams, from reputable companies that are usually easy to source.

A reputable and very experienced installer is more important than the brand, as that is where the process goes wrong and can cause it to fail to cure properly. This causes major offgassing that may not stop.

The DIY kits for this type of spray foam are a definite no. And it must be closed-cell spray foam, which is a vapor barrier. 

I might recommend these to healthy people who are set on spray foam. I don’t usually recommend them to people with MCS because of the possibility of prolonged offgassing.

The companies say they do not offgas, but I seen many stories from moderately sensitive people that this does offgas noticeably in buildings. A small sample may air out quickly, but test this in a building before using it.

At least two years (if this is installed correctly) may need to be scheduled into offgas this for the moderately sensitive. If not installed correctly it’s a goner, you’re going to be scraping out the whole thing. 

If you are mold sensitive but not chemically sensitive you could consider this in a van. I have heard though, both in Airstreams and in vans, stories of spray foam pushing out the frame in areas causing problems. A skilled installer may be able to clarify why this happens.

Airstream as well as Winnebago, have moved away from two-part spray foam due to problems. 

Wall and Ceiling Materials 

Metal is your safest bet unless you are putting the plastic covers back on.

If you do put the plastic covers back on, caulk around the seams to prevent moisture from going into the walls. 

If you want your interior walls to be another vapor barrier layer, the metal or plastic should be used and caulked airtight.

If tin/aluminum tiles are used it’s best that behind them is airtight (though if you have enough insulation this might not be necessary). If you don’t have enough insulation, you could have condensation behind the wall cover. 

Some folks are putting canned spray foam behind the tin tiles for an extra layer of air sealing.

I have also seen gaskets with solid silicone sheets used to make the walls airtight.

In a cargo van or trailer, instead of using metal walls, my preference would be to keep the walls as simple as possible so that you can open them up to check on problems.

You may want to use plastic sheets, or could simply tack up and cover the foam with the material of your choice:

  • Silicone “leather” which comes in rolls
  • Polyurethane leather
  • Polyester fabric murals
  • The grey side of house wrap (which looks cool)
  • Painted foil or metal walls with AFM metal paint
  • Polyethylene wall tiles (if you can tolerate the glue)
  • Seal everything with shellac and then paint directly over XPS

There is no reason to use PVC, the most toxic plastic, in areas like the ceiling tiles. But real tin ceiling tiles could be used as a non-toxic alternative which also adds a fun look to your camper. 

While The Vanual, a popular van conversion, looks very pretty with its wooden ceiling, I would avoid plywood as walls, ceiling or subflooring. There are just too many points where the wood hits the metal.

If you are intent on getting this look, you would have to have lots of insulation at all the metal ribs to make sure dewpoint would never be hit there.

If that is possible, then you could use plywood with strips of wood over it to get the look in The Vanual. Use a wood that can take high humidity. 

Floor Materials for a Van

Linoleum and other Resilient Sheet Flooring Works Well

I wouldn’t use wood to raise the floor joists as the wood right against the metal is usually a recipe for condensation and mold.

Rigid foam may be your best bet for floors to solve the thermal bridging there, with the same system of canned spray foam above and riveting used to make it 100% airtight. 

Flooring materials that could be considered include:

  1. 1. Metal sheets, which could be painted with AFM Metal Primer with different designs for a pretty effect, or covered with rugs.
  1. 2. Marmoleum. Be careful here as Marmoleum sheet (the rolls) have jute backing. Use plenty of insulation underneath and an underlayment with a thermal break to prevent condensation. The Marmoleum tile format has a polyester backing.
  • 3. Plastics: Hard plastic sheets like plexiglass, rolls of silicone, EVA mats.
  • 4. Plastic-based flooring: plastic rugs, or luxury vinyl planks (LVP). Both are extremely low in offgassing, though still could be bothersome for some folks. You could also use polyurethane sheet flooring which is practically odourless or other similar flooring products listed here.
  • 5. Garage flooring: super-duper easy to install. The brand is Europe is Bergo but in the US there are a number of them on Amazon like GarageTrac.
  • 6. Wood Flooring: Engineered wood flooring or laminate if you are sure you have enough insulation underneath to prevent condensation from forming under the wood, a thermal break, and that the wood can withstand the humidity in your area. 

Subfloor

If you are concerned about denting, use hard plastic sheets (plexiglass) or metal sheets. MgO board has worked for some but is prone to cracking (and is permeable).

Interior Structures: Bed, Cabinets

Bed Platform – Non Breathable Set up

Camp Like a Girl and The Vanual used plywood for their bed bases. If it’s softwood plywood it needs a little time to offgas formaldehyde.

The other option is formaldehyde-free Purebond plywood (but I wouldn’t use a non-moisture resistant wood species in a van or small trailer if you will have high humidity).

Purebond does come in moisture-resistant species, even cedar. The glue is not made to withstand high humidity but should work in many vans.

It also doesn’t let the mattress breath. Mattresses are very susceptible to becoming damp in campers. Even in a house, one should never put a regular breathable bed on a solid surface.

To prevent this moisture transfer there are two strategies to use on a platform.

One, cover the mattress with a waterproof protector before installing it in on the camper platform. This one is highly tolerable. 

The other option is to use a bed that doesn’t transfer moisture and doesn’t mold, like this well-tolerated TPU air mattress (takes only a couple days to offgas to my standards).

An air mattress won’t keep you warm. I use the thickest Thermarest which is more comfortable than an air mattress for me (took a week or so to offgas enough for me) and I put a waterproof cover on it.

If you want to add insulation, I would add cork sheets (Thermacork brand), this is healthier than foam because of the flame retardants in foam.

Bed Slats – Breathable Option

Another strategy is to have the bed base made of planks/slats that allowed some airflow. With this strategy, you may be able to use a bed that is not covered in plastic or isn’t an air mattress.

Either way, the bed should be flipped and checked often for dampness, especially if you cook or shower inside.

I would use bedding made of polyester, wool, or silk, (and not cotton) because these are more resistant to the high humidity in vans. 

How to keep warm in a bare metal van 

Since insulation is so tricky, many mold avoiders keep the van bare. The best way to stay warm is to have insulation below you and above you.

Extra protection from the elements would be to add a canopy over the bed and a heat source.

Insulate Under You

I like the method of adding insulation below you. There are a few ways.

A thick Thermarest like the Mondo King provides insulation under you. Or just a slab of polyurethane foam (I have used both).

But I like the idea of adding a layer of insulation below that. I like Thermacork, a pure cork insulation. You could use foam: EPS polystyrene (the kind made for packing or crafts should not have flame retardant), it is also a little bit breathable.

You then add your waterproof layer to your bed. Then add a biomat or heating blanket.

Above you, you have your sleeping bag/blanket.

Ideally for warmth, if you can tolerate it, your heating blanket is actually inside the sleeping bag. Heating blankets can run off solar. The smaller ones are only 60 watts but will keep you really warm if they are inside a sleeping bag.

Stay Even Warmer by Creating a Canopy or Tent Inside

You can go one step further to stay warm and create a canopy or use a raised up tent inside the van. Anything to create a canopy – using the fabric of your choosing (as long as you have enough air) will keep this even warmer.

If the area inside my tent or canopy is large enough for this to be safe – I add a tiny heater. I use this tiny Honeywell heater in all my small structures. Be careful!! you need to take a lot of precautions when adding a heater in a small space. Make sure you have enough clearance.

Cabinets

For cabinets, if you do use plywood, go for a formaldehyde-free plywood like Purebond (moisture resistant wood types only – the glues might not hold up to extreme humidity), offgassed APA exterior plywood, or use solid wood (which may warp in high humidity). I much prefer metal cabinets. You could also use polypropylene cabinets.

Ventilation in a Van

You need fans that move air out – one above the shower if you have one, and one in the general space.

My CampLite trailer had two fans and we still have problems just with cooking humidity making the mattress wet.

The standard camper fans are called Fan-tastic.

Van Appliances


The Vanual has some cool tips for solar power, wiring, and appliances.

If you want to go off-grid you will need solar. And you generally you will need to tolerate a fuel stove.

The Vanual and other van owners speak highly of Goal Zero solar systems because of how easy it is to install. Some people just use the solar charger outdoors.

The other option is to wire the van to plug into a campground plug (or modify to plug into a house), this would allow you to cook on an electric hotplate and would allow an electric heater.

Right now I use an Instant Pot to cook everything and I release the steam outside. This is a really good way to reduce moisture in a van or little trailer. You can cook almost anything in that.

Using an electric blanket is a good heating option to save energy. The best kinds are the large ones with the 10 hour shut off time to keep you warm all night. If you don’t tolerate those, a biomat may be better tolerated.

I would not use the stand-alone propane heaters that go inside as they will not be safe for those with MCS.

For cooking, if you are off the grid you will need to burn some fuel to cook. Cooking outdoors is safer. Alcohol burning stoves are safer than propane. Though this won’t be tolerable for many.

For a fridge, I would go with a 3-way fridge that can run on propane solar or AC electricity. Unlike in most trailers, propane is stored inside in vans, so this could become a problem for some.

The Vanual recommends running this fridge on solar or the car battery.

Here is an example of a fully decked out custom van made for someone with MCS (you would want to see how the construction was done if you wanted to copy or buy this one).

Choosing a Van

Sensitive folks have reported liking the big 4: Nissan NV, Dodge Ram Promasters, Ford Transits, and Mercedes Sprinters.

Some have found that Chevy and GMC were not as good for people with chemical sensitivities.

Anyone sensitive should check out a number of brands. And of course, there are differences between the brands in terms of size and height and all kinds of things.

Corinne Segura is a Building Biologist with 8 years of experience helping others create healthy homes.

Did you find this post helpful? If so you can buy me a coffee to support the research behind this blog. Thank you!

Carl Grimes, Certified Indoor Environmental Consultant, reviewed the mold preventative insulation system for vans. Extreme mold avoiders are using this system with success.

Filed Under: Tiny Homes and Trailers Tagged With: mold avoidance paradigm, tiny homes and trailers

Cargo Trailer Conversion

June 21, 2019 by Corinne 18 Comments

Converting a Cargo Trailer into a Travel Trailer – Mold Preventative, Low-Toxin Design

converting a cargo trailer into a camper

I’m converting a small cargo trailer into a tiny trailer that can be used for sleeping and living. In the end, this model is only useful as a portable kitchen and bath. Other models are sturdier and may work better as insulated conversions.

The cargo trailer is a TNT brand DBL ‘A’ 6×12, White, 12″ extra height making it about 7 ft high on the inside. The extra height is well worth it I think for a sense of space.

Side and roof vent (side vents are so small that they bring in very little air. The roof vent can only be wide open if it’s not raining). RV door lock that locks from the inside (vital) and barn doors that lock from the outside (easier to handle than the ramp door). You may want to move the lock to the inside when living in it. Front and roof are curved in this one.

I recommend all of the products here, some products have affiliate programs and some do not. Upon purchase, I earn a small commission through affiliate links at no extra cost to you.

Costs in Canadian Dollars:

  • $6100 cost of trailer
  • $3600 cost of renos at trailer shop – metal floors, install window, take out plywood (much cheaper, and probably faster if you have the factory do these.)
  • $1500 cost of insulation
  • Labour for insulation and vapor barrier, foil and glue – lost track
  • $1300 Electrical (+ $185 for CSA inspection and approval – allowing me to legally park the trailer in Canada)

I have seen better prices in the US, you can go smaller and get a better price, but for me, 6×12 is the minimum amount of space needed to make a happy little home.

Joey was able to do this for $7000 with the factory doing most of the work. In the Facebook group Mold Avoiders on the Road, you can see people having smaller trailers renovated for under $4000.

Necessary Renovations:

plywood between skin and frame

Remove plywood.

Install window – 24 x 30 vinyl awning style to stay open even during the rain (you’re going to need air in such a small space). It’s vertical so that the framing did not need to be cut. I do not find the hard vinyl has a smell but you can use aluminum.

I wish I had put in two as it’s nice to have windows. One does bring in plenty of light through, along with the vent on the roof.

You can look for an RV window or you can use a tempered glass house window and reinforce the framing around it.

Install metal flooring 3/16 hot roll plate steel flooring, 1000 for the metal + welding. See this thread for an in-depth discussion on what type of metal to use.

Electrical work

A 30 amp panel with a campground plug and 4 outlets inside. You may be able to make do with fewer outlets but the electrician wanted a dedicated outlet for the fridge and one for the heater. Then I have one near the bed for a computer etc, and there is one up high to string up a light and run any kitchen appliances.

Have these renos done by the factory and not after you buy it. This was a huge mistake that costs me a lot of money and didn’t save me any time like I thought it would.

I should have known better as I had read Joey’s conversion story (highly recommend reading that for another version of a conversion and some ideas on what you might want to add. (I disagree that foam doesn’t provide a lot of protection from the cold and heat. 2 inches of XPS foam is R-10, that is really good).

How long it will take to customize one depends on the brand, the factory and the time of year. Add 2-3 weeks on to their estimate.

The back door in mine has structural plywood so that still has to be removed and needed metal reinforcements. The front end had plywood between the frame and the skin which was a major pain to remove. Look for a brand that does not have these two issues and you will save a lot of money.

If you want to do it yourself check out this thread (you have to sign up). Watching someone’s account of doing it herself is well worth it. You will see tips on taking out the plywood and choosing a metal for the floor.

Do the Walls Need Reinforcement?

A big question with cargo trailers is if you need wall reinforcement when you remove the plywood. There are two answers to this.

The first is that it depends on the brand, some brands will tell you that their trailer is good to go with no plywood, these have thicker frames like the steel CM trailers. Or some companies can customize it with thicker frames. See the pictures below.

The second answer is that the companies might say they are not strong enough but people leave it un-reinforced anyway. Erik Johnson, me and two other mold avoiders have taken out the plywood and not added anything that would replace it structurally.

Mine started leaking and the company that sold it to me claims that the reason it leaked is that the plywood was taken out and this means there is less stability and it’s easy for pieces to come apart and caulking to come loose. I have braced mine since.

If they won’t customize it without plywood, remove that part yourself and reinforce it (or don’t) yourself.

custom aluminum aluminum framed cargo trailer

The first picture is a customized trailer reinforced with aluminum frames. Very robust. If you look closely you can see tape between the frame and the exterior, a mold risk.

The second picture is a CM all steel trailer with a robust steel frame, the frame is standard and the company does not recommend reinforcement.

The third picture is a standard frame, with plywood removed. Though it’s not reinforced the owner is doing just fine with moving it around frequently. The brand is Victory.

This picture is my trailer it has the least robust frame of the bunch, while the seller advised that it could be reinforced for longer trips (he told me this after the insulation was up). I have now braced/added strapping.

Toxicity of a New Cargo Trailer:

A cargo trailer smells much stronger than someone might anticipate a new metal box to smell. An extreme avoider in a hot climate would leave it sit for about a year before using.

I have seen two people who have turned around and sold them soon after buying due to the strong smell. Mine is now a year old and not totally offgassed.

The smell comes mostly from the body of the trailer. It is a glue smell and may also be oils on the metal. There are many other parts that are non-metal (differ slightly between brands) that may include:

Caulk of different types, double-sided tape (you do not want to buy a cargo trailer with tape in the frame – this is a mold risk), plastic on the back of the RV door, plastic and glue (very smelly) in the vents to the point that you will likely not be able to use these vents for air, rubber and foam (glued on) can be found around the RV door, around the barn doors, and possibly around the window on some models, there may be tape holding up wiring, there is the usual plastic coating on the wiring, plastic light and light switch may be included, there may be spray paint on wiring, there may be caps on bolts, screen on top vent, there is also exterior paint which some people have said they are offgassing but I could not pick up a smell on.

In such a small space there are also the tires on the outside to consider – on a hot day you will smell these.

Rustproofing chemicals may also be added to the frame. (Thanks to Madonna Ramp for some of these materials from other brands).

A lot of this can be covered and you can see in mine that it is almost completely sealed up. If you buy one and it smells strong, give it time and/or seal it up like I did mine.

Every trailer takes time to offgas. Someone was able to get the company Mirage to build without glue or caulk, but she was not able to tolerate the trailer brand new. I would not recommend leaving out glue and caulk.

Buying a Used Cargo Trailer: 

I did not see any used cargo trailers in my area when I was looking but you can sometimes find these. You would want to know what it was used for. Look for gunk and rust that will accumulate at the bottom around the frame.

Building out the Interior – How Mine was Done (The Second Time)

  • XPS Owens Corning Foam 2 inches on walls and floor (you can also use polyiso, the most well-tolerated foam, or EPS styrofoam which is not a vapor barrier on its own but is usually faced with foil or plastic). 2 inches XPS is R-10. If you are going to a climate that is extremely cold, add another layer of foam – polyiso or XPS on the inside until you get a high enough R-value for your climate. The reason I chose XPS is that is has a high R-value and it doesn’t lose its R-value in very cold weather like polyiso does. I also could not find polyiso in my town.
  • 1 inch Foil-backed EPS on ceiling (because I needed something thin enough and flexible enough to be curved on the ceiling) (Note: This is backward, there should be more insulation on the roof but I wanted the roof to stay curved and the insulation to stay between the frame so I kept it simple.). The brand was R-Tech but I can’t find a link for this. I can add another layer of 1-inch foam if it gets too cold.
  • Great Stuff spray foam should be placed behind the foam and on the gaps of the rigid foam (airtight so no moisture gets behind the foam). There is one for small gaps and one for larger gaps you will need some of each. This then needs to be braced and riveted to the structure which is hard to do in many types of cargo trailers and I would not recommend these standard brands like the one I bought. 
  • GE 100% silicone for touch-ups to waterproof the exterior
  • A Fantastic Fan in the roof vent would be helpful for ventilation, drawing air out of the top will draw it in the window and turn over a lot of air. The fans also help with humidity. This has to be wired in with the electrical.

There is a rumor that spray foam will crumble with movement in a trailer but speaking with the company Great Stuff and some folks who have taken apart trailers they have not seen this be a problem.

EMFs:

All this metal and foil did not stop wifi or cell phone reception – it lowered my wifi connection only slightly. If you are concerned about EMFs (electromagnetic fields) consult with an EMF specialist and test out a metal structure before buying. In theory, it is a Faraday Cage that blocks out some external sources of EMFs and may intensify what is on the inside.

Fixing the leaks

My TNT Mirage Trailer has a number of poorly built aspects. The company took no responsibility for this and the leaks.

What has to be fixed on this model or checked on any model: The back doors were leaking, the top sil needed caulking, the door seals were not done right, the doors were bulging at points, bending the doors and adding gaps for leaks. The front diamond plate had nothing behind it, it was a negative lap – a poor design, the front wall should come all the way down. The front plastic cap on the top roof is also a negative lap.

Vertical seams have the ability to let in water in a big storm or when driving it in the rain. Always check windows, doors, and any openings. Screws should be caulked as well. Look for a well-done roof design. This roof design is good. I have seen custom designs with vulnerable roof seams.

Aggressively hose test this before adding insulation and know where the weak points are. After moving it is when things are most likely to come open.

When recaulking metal parts, attempt to open things up and get caulking between parts and not just over the seams.

These trailers are difficult and I would not attempt insulation in this style/brand again.


Erik Johnson’s Cargo Trailer:

Erik is the pioneer of cargo trailer living. He called his trailer and camper MECUs (Mobile Environmental Containment Unit). Erik used EPS foam without flame retardants. I don’t know how he sourced this but I would think this is the kind used for packing, not insulation.

In Erik’s trailer, he left a gap (like I did at first) between the foam and the exterior. He put in weep holes at the bottom in case condensation did find its way to the back. Some trailers like mine come with weep holes.

He has said that there has not been any condensation at the back and he has had this for more than a decade. I put the insulation in front of the frame which created a space naturally behind it (though my floors and ceiling have no space).

This method did not work for me, major condensation formed behind the walls and I don’t know anyone that was able to get this to work.

Here is a video of his camper which is done like his cargo.

Other Trailer Options:

You can build out the interior as much or as little as you like.

  • You could add batteries but consider how long these will last you away from plug-in power.
  • You could add solar panels but this doesn’t get you a lot of power, it may be easier to just buy a solar kit that is portable that is made for camping.
  • If showering in another building, campsite bathroom, or outdoor shower is not an option for you, you could install basic plumbing. You would want to avoid tanks and have very simple plumbing that goes directly out to a bucket or pipes out into a greywater system. You will have to make sure you are following the rules with greywater here. I want to avoid all cooking, showering, and clothes drying inside to keep humidity down.
  • Options for outdoor showers include simple bucket showers, passive solar shower (that one is PVC-free, unlike most of them), active portable hot water shower (this one comes recommended by mold avoiders), or an outdoor tub big enough to bathe in. A privacy tent can be used to shower outside or set up a toilet outside. You can also DIY and set up something simple like wrap house wrap around 3 trees, or tie string around 3 trees and the string holds up shower curtains.
  • You could install a simple camping or composting toilet inside or use it outside if you need to: some of the options are Luggable Loo, Mini Porta Potty, or Laveo Dry Flush.

Finishing the Interior:

Walls

I was going to use these posters.

AFM metal paint on the metal.

Polyethylene wall tiles.

Floors

For now I’m using these mats on the floor temporarily. They smell like straw.

I am currently offgassing Marmoleum (takes one month in sun to offgas) but I don’t like that there’s a jute backing under the Marmoleum against the metal, that’s a mold risk).

I had considered Cali Bamboo Cork (not sure yet how long it takes to offgas, definitely much longer than Marmoleum). 

Note: Flooring I ruled out: Thermacork decorative cork the only cork I know of that is heat-pressed with nothing added – not good for floors. It flakes easily and won’t last long.

Cork underlayment – I bought this and tested another one that claimed 0 VOC (volatile organic compounds). It is going to need a lot of time to offgas despite these “0 VOC” polyurethane glues (not at all). A year later I have not offgassed the cork floorings (though they were not out in the sun for a year).

If you have space, I like this organizer. 

Heating, Cooling, Lighting, Laundry:

  • I’m have this light bulb up (the cord smelled strong and offgassed in my car for a while but then was fine for me). I also like this little nightlight but it won’t provide much light.
  • I will mount this silent, energy-efficient, space-saving heater  (which smelled at first but did offgas quickly in the sun) with this thermostat. 
  • In the summer I will use a portable AC, I like this one for the level of offgassing. I throw them away every fall as they tend to go moldy after one season or two and I have nowhere to store them. 
  • I’m using this clothes dryer to dry my clothes and I love it. I don’t want to add humidity in the trailer so I am using it outside undercover. It works well even in humid and cold outdoor temperatures (and it’s not as mini as it looks). I have used this successfully down to freezing. I have not tried it much before freezing but I’m still really happy with it. 

Kitchen:

  • I bought this fridge which needed a lot of offgassing outside including running it outside. This one smelled more than other brands I have tried like Danby.
  • I’m using this kitchen island which offgassed fairly quickly but you could use a metal version if you want to avoid wood (and wood sealers and glue). 
  • I offgassed this cutting board pretty fast. I’m just posting that because I love it so much
  • Thrift shop bowls 
  • This hanging basket to organize kitchen items 
  • I’m using a pressure cooker to cook – you can make almost anything in this. If you use it outside or at least release the steam outside you will have very little or no added moisture to the trailer. You can get away with no other stove, oven or microwave. You just need an extension cord to use it outside.
  • I’m going to buy the travel Berkey for drinking water, there is no plumbing in the trailer. Berkey is ideal for well water and water from campsites if you are not buying water. 

Bedding: 

In a high humidity situation like a trailer, tent or other camping structure it’s important to have a bed and bedding that will not go moldy.

My bed will be up on slats soon (right now I am turning the Thermarest over every few days – it went moldy so it is crucial to get it off the ground onto slats).

Cotton does not hold up well in high humidity, so I have used more mold-resistant materials.

  • I’m using my super-duper bed-like Thermarest 
  • Polyester sleeping bag 
  • Polyester pillow 
  • Polyester pillowcase and sheets (or the one that is made for Thermarest)
  • Microfiber towel (no cotton) 
  • This heating blanket keeps me warm on very little electricity. If you are worried about EMFs then an infrared heating mat is supposed to be

Corinne Segura is a Building Biologist with 8 years of experience helping others create healthy homes.

Buy Me a Coffee at ko-fi.com

Did you find this post helpful? If so you can buy me a coffee to support the research behind this blog. Thank you!

Filed Under: Mold-Free Building, Tiny Homes and Trailers Tagged With: mold avoidance paradigm, tiny homes and trailers

Composting Toilets for Those Sensitive to Mold and Chemicals

September 18, 2018 by Corinne 4 Comments

I want to talk about composting toilets and greywater systems from the standpoint of the chemicals involved, how likely they are to grow mold, the costs, and the benefits for someone with MCS to being semi (or totally) off the grid.

This post contains affiliate links on some of the products I use and recommend. Upon purchase, I earn a small commission at no extra cost to you.

1. First Generation Composting Toilets

I had the SunMar Spacesaver in my tiny house because it’s the smallest indoor self-contained composting toilet I could find at the time of building in my area, and the only one that would fit in my tiny bathroom.

It was also the best-priced unit at the time. I absolutely do not recommend this toilet as it completely fails at handling liquids. Here are a few of the other challenges followed by some recommended brands.

Toxic Additives in Composting Toilets?

I had a bad chemical reaction to the additives. I didn’t know that the toilet requires a significant amount of input in terms of additives (and money).

There are three things you need to add regularly: 1) an enzyme spray which smelled fine to me, like a very light non-toxic soap might smell, 2) a bulking material of hemp, peat moss…. and maybe sawdust. This material could be problematic for those extremely sensitive to mold.

You could definitely make/source your own bulking material to make sure it’s safe for you.

And 3) the microbes that you add to speed up the compost and keep it “odorless”.

I had such an acute reaction to the microbe mix. It smells somewhat like a urinal cake. Everything online said it was non-toxic and natural… hmm. I called them to ask what is in it and they said citronella.

Citronella contains methyl eugenol which repels bugs and is a possible health concern needing more studies to confirm its safety. There are a few essential oils I consider to be harmful for MCSers and citronella is definitely one of them.

I had to figure out what kinds of microbes were needed for the toilet and I found out that EMBokashi will work just as well and doesn’t have fragrance added.

After using the toilet for a few months, I can say that the enzyme spray is not necessary. You could just use the Bokashi or Bokashi and a bulking material.

However, I am not happy with this model at all. The upkeep is very smelly work and it often overflows with only one person using it.

Dealing with the overflow is horrible. Even before it overflows the system is such that liquid accumulates below the tray where it becomes very smelly, and moldy.

One person using this toilet full time requires that it overflows into a septic system or blackwater system. Not very self-contained at all.

Offgassing the Unit

Another chemical issue is with the unit itself. It needed some offgassing outside to get rid of the plastic and glue smells. I left it outside for a week. A month would have been ideal. I was extremely sensitive at that time.

Necessary Hook-Ups for the Compost Toilet

There is some installation necessary that ideally would be contemplated before building the bathroom of a new house!

A vent has to go through the wall, outside, and above the roofline. An emergency overflow valve needs to go through the floor and out to…. somewhere (a bucket)… or to the septic or sewage drain if you are on the grid.

You do not need to have water as an input for this type of unit or bolt it down in any way.

There are electric and non-electric self-contained units. The Spacesaver is electric. It does have a small fan which creates negative pressure, though it can easily be overpowered by a bath fan – pulling the odors back out.

There is a need for a special outdoor compost for self-contained indoor composting toilets; they say the humus the toilets produce is totally benign but there is no way it is in there long enough to be benign.

Benefits of Having a Composting Toilet

There is a huge benefit to being off the septic system and that is the freedom to put your tiny house/yurt/dome on any piece of land with some extra amps to spare & a freshwater hose (and of course you could get totally off the grid with solar panels and rainwater collection).

Challenges of Having a Composting Toilet

If you are comparing the initial cost and cost of (ongoing) inputs to just hooking up to a city sewage line, then the self-contained composting toilets are going to seem expensive.

If you are comparing the cost to installing a rural septic tank and the maintenance of that septic tank, then it starts to seem like a really good deal.

If you are extremely sensitive you’re going to want to make sure you can source some tolerable bulking material before you start.

A lot of the maintenance also includes some strong smells of excrement so you have to be able to tolerate that. It you don’t want things to start festering and producing bacteria and mold you have to empty this often, possibly every day.

I have seen some mold growing in the finishing drawer.

Another challenge for people who are disabled is that there is some work – there is the buying of the additives and maintenance. Maintenance involves turning a crank every second day for a minute.

Unclogging the mesh screen if that ever clogs up, checking to see if the system has overloaded via the emergency drain and other troubleshooting if anything goes wrong.

There is a fair amount of troubleshooting so far for me. The fan will have to be replaced or fixed if and when it stops working.

You also empty out the bottom drawer of humus every few weeks.

I’m having trouble with the Spacesaver as I don’t think it has enough capacity for one person let alone two. The tray is filling up too fast, which can be a major problem if you don’t have somewhere safe to dump it and it overflows liquids.

I don’t recommend this one as it does not handle liquids well. A urine separator would be the next type to consider.

2. Urine Separating Composting Toilets

Those who live in tiny houses began switching over to urine seperator toilets to get around the problem of the first generation of composting toilets.

Nature’s Head  and the Separett are well liked.

What’s different about these is they separate the urine out to a separate collector.

This is crucial. It is the reason the Sunmar was overflowing and going moldy in the tray for me. I would go with one of these for sure when I replace the Sunmar.

3. Dry Flush Composting Toilets

The other type that is popular now and is even more suitable for the chemically sensitive is the dry flush self-contained.

A dry flush self-contained uses bags to contain the human waste. It’s much cleaner and much easier.

The bags are somewhat expensive and you have to carry them out to a trash bin.

Some people are really happy with this and it eliminates a lot of problems with smells and mold with the other ones.

4. Incinerating Toilets

Incinerating toilets like the Cinderella are making a bit of a comeback. Some chemically sensitive folks have chosen this option for ease of use.

No human waste to collect, no bags to throw out.

Folks who are chemically sensitive can often tolerate the smoke but you will have to decide if that is right for you.

Those primarily mold sensitive may like this option.

5. Bucket and Bag Set up

If you live in a simple trailer or van or are camping you may want an even simpler toilet that uses bags. The Cleanwaste one is popular. And I have tried the luggable loo with success.

Other Types of Composting Toilets

This post deals with indoor self-contained units but other types of composting toilets include: an outdoor bucket system, an outdoor dug out (outhouse), indoor central flush, central dry, and indoor bucket systems. 

6. Greywater Recycling

Being off the septic system means you also need to safely recycle your greywater – which is the water that comes out of the kitchen sink, bathroom sink and shower.

These contain more bacteria than you think via raw meat and the bacteria on your body etc.

Eco-Sense has a really good free overview and guide including using a worm bin system to remove food scraps from the water. Here are the instructions for the worm bin filter system.

There are a lot of different types of systems and for more detailed instruction this book is super user-friendly and outlines the simplest options depending on the number of people you have on the system.

You need both some kind of filter and water dispersion. We tried just burying the pipe so that the water would simply drain into the ground but the water could not absorb fast enough and it backed up through the house. Gross, yes.

We dug a small pit and it still backed up. Right now I have a larger pit but it still has no filter on it, it worked fine for years with little upkeep. (Note it’s not technically safe to have the water drain above ground, but this did work fine for me).

Corinne Segura is a Building Biologist Practitioner with 8 years of experience helping others create healthy homes.

Did you find this post helpful? If so you can buy me a coffee to support the research behind this blog. Thank you!
SaveSave
SaveSave

Filed Under: Healthy Building, Mold-Free Interiors, Tiny Homes and Trailers Tagged With: healthy interiors, tiny homes and trailers

An All Metal Tiny Home

July 30, 2016 by Corinne 12 Comments

Here is the tiny house being built for my client right now by Tiny Green Cabins. The house is made with no wood whatsoever, including plywood and OSB! This is made for someone who cannot tolerate wood of any kind. She is extremely sensitive to offgassing and mold. 

This post contains affiliate links to products that I use and recommend. Upon purchase, I earn a small commission at no extra cost to you.

Here are the specs:

Size is 8’ x 20’ x 12’-5 1⁄2” tall, with an approximate weight of 9k GVW.

The trailer is a custom welded steel channel beam trailer.

There are options for the paint used on the trailer.

Steel Underbelly 2 x 4, 16 gauge joists.

The cold-formed steel joists are bolted to the trailer frame.

Walls are framed with 2 x 3 18 gauge cold-formed steel studs @ 19.2 on center, fabricated with screws and welded connections. 

Rain screen (furring) is made of metal (Rain screen in important in case moisture does get into the walls).

Roof structure is 18 gauge cold-formed stacking above joists, fabricated with screws and welded connections. No wood used!

The loft has metal floor sheathing. The kitchen has a stainless steel sink with metal cabinets and countertops.  Other countertops options can be considered.

For the bathroom there are different options – you can have RV hook-ups or a composting toilet and greywater system. (Nature’s Head is the best composting toilet. Others like Sunmar have major issues.)

There are a few options for windows. I prefer aluminum, but they cannot be sourced everywhere. There are other options in my window post that people tolerate well. Typar zero-VOC window flashing is being used.

Fabral smooth painted steel to wrap the exterior walls, and Fabral “w” metal roofing for the roof. Metal at walls is riveted and steel roof and trims screwed. Fabral should be tested first to make sure the paint finish is tolerable. Other metal finishes are available with different brands.

Ceiling is corrugated steel

Interior walls are Fabral steel attached with screws. The interior comes in different colors, or can be painted later with metal primer and paint. Caulking is used to prevent water vapor from entering the wall cavity.
Metal flooring is 2 layers of 18 gauge steel layered. Foam is used as a thermal break and insulation.

Doors are metal and glass.

Insulation options are XPS foam or foil-backed polyiso. Foam is being used as exterior sheathing/thermal break as well. Other materials could be considered for insulation but rigid foam was our top pick here. Tyvek tape is used to seal the sheathing if tolerated.

They also used caulk on the inside side for an extra barrier to water vapor entering the walls. (This is a double vapor barrier – note the risk. Please consult with an architect if you can only tolerate metal and foam).

Heating and cooling a 12-15,000 BTU inverter heat pump, Daikin LV series or Mitsubishi hyper-heat models installed by an HVAC company is recommended. Other heating options such as wall mounted electric heaters or propane RV heater/AC combos (off-grid) could be used. Another propane option that is tolerable is a direct vent heater.

For a hot water heater, we are using propane on demand. This is the best way to go for water to keep the house to 50 amps or less.

Exhaust fans are very important in an all-metal house to keep the humidity as low as possible. In the bathroom, it should be exterior mounted as to not leak moist air into the ceiling. An ERV could be a good option if you have a composting toilet (this depends on your climate as well). In the kitchen, the exhaust fan needs to vent to the outside. A dehumidifier may also be needed if condensation forms on the walls or the mattress becomes damp (do not put a standard mattress straight on the ground).

For appliances, a propane fridge should be considered to reduce electricity needs (2-way or 3-way refrigerators can be good depending on your needs and if you are incorporating solar).

An apartment-sized stove can be used or else a small convection oven with a cooktop. If you can tolerate propane or alcohol stoves those can be considered for an off the grid house.

Flooring can be left as metal. Tiles can be considered although this would add considerable weight. Natural carpet or rugs can be considered as well to cover the metal.

Corinne Segura is a Building Biologist with 8 years of experience helping others create healthy homes.

Thanks to Luke Skaff, electrical engineer, for help on the technical aspects.

Always consult with an architect or engineer on moisture management in your building envelope.
SaveSave
SaveSave

Filed Under: Mold-Free Building, Tiny Homes and Trailers Tagged With: mold prevention, tiny homes and trailers

  • Go to page 1
  • Go to page 2
  • Go to Next Page »

Primary Sidebar

Stay up to date with the Latest!

  • Facebook
  • Instagram
  • YouTube

ABOUT ME

Hi, I’m Corinne Segura, I hold a certificate in Building Biology, and a certificate in Healthier Materials and Sustainable Buildings, among other credentials below. I have 8 years of experience helping people create healthy homes.

More about my educational credentials

Footer

Sitemap

Amazon Affiliate Disclosure: As an Amazon Associate I earn from qualifying purchases.

Privacy Policy, Disclaimer, Disclosure

Do Not Sell My Personal Information

Resources

Business inquiries

Copyright © 2023 · Corinne Segura | My Chemical-Free House Consulting