• Skip to primary navigation
  • Skip to main content
  • Skip to primary sidebar
  • Skip to footer
  • About this Site
  • E-Booklets
  • Shop
  • Resources
  • Consulting

My Chemical-Free House

A Guide to Creating a Healthy Home

  • Healthy Building
    • Insulation
    • Windows & Window Treatments
    • Glues & Caulks
    • Grout & Mortar
    • Drywall
      • Drywall Mud & Wall Texture
    • Showers
    • Doors
    • Pressed Wood Products
    • Sheathing & Subfloor
    • Pipes
    • Alternative Building Systems
    • Non-Toxic Prefabs
    • Building for the Chemically Sensitive
    • How to Test Materials
  • Healthy Interiors
    • Flooring
      • Gym Flooring
      • Flooring Underlayment
    • Kitchen Cabinets
    • Countertops
    • Mattresses
    • Sofas
    • Leather Furniture
    • Desks and Chairs
    • Sealers
      • Paint
      • Mineral Paints
      • Linseed & Tung Oil
      • Natural Wood Pigments
      • Natural Plaster
      • Natural Countertop Sealers
      • Concrete Sealers
      • Wood Finishes
    • Bathroom
      • Bathroom Vanities
    • Rugs
    • Wallpaper
    • Kitchen Appliances
    • Heaters
    • Reduce Flame Retardants
    • Reduce New Home Offgassing
    • Reduce Fragrance & Smoke
    • Air Purifiers for VOCs
    • Cleaning Products & Air Fresheners
    • Personal Care Products
    • Green Certifications
    • Gift Guide
  • Healthy exteriors/gardens
    • Decking Materials
    • Deck Stains
    • Deck Cleaners
    • Exterior Paints
    • Sealant for Concrete Birdbaths
  • Tiny Homes and Trailers
    • List: Simple Homes & Shelters
    • List: Trailers & RVs
    • List: Emergency Housing
    • Cargo Van Conversion
    • All Metal Tiny Home
    • Simple Insulated Shelter
    • All Aluminum Travel Trailer
    • Cargo Trailer Conversion
    • Teardrop Trailer
    • Tiny House Systems
    • Flooring for Vans, Trailers
    • Composting Toilets
    • How to Offgas that New Car Smell
    • Building for Chemically Sensitivity
  • Mold-Free Building
    • A Detailed Mold Preventative Build
    • The Causes of Mold in Tiny Houses
    • How “High Performance” can Help Prevent Mold
  • Mold-Free Interiors
    • Mold Testing Overview
    • Air Purifiers for Mold
    • Ozone to Kill Mold
  • Mold Avoidance Paradigm
    • Decon your Car
    • Camping Gear
    • Planning a Sabbatical
    • Traveling with Environmental Sensitivities
    • Locations Effect Ebook
    • The Locations Effect – Canadian Locations
    • The Locations Effect – Caribbean Campsites
    • Interview: Healing MCS with Mold Avoidance

camping

A Guide to Non-Toxic Camping Gear (And Keeping it Mold Free) | 2022

January 4, 2021 by Corinne 66 Comments

I have updated this post after having spent two years of close to full-time camping.

The focus is still on avoiding chemicals, but I am adding more unusual camping equipment and techniques for avoiding mold, updating new gear I really like, and some new tricks.

This post contains affiliate links wherever the brands I like have an affiliate program. Upon purchase, I earn a small commission at no extra cost to you.

Choosing a Tent Style

A Cheap and Easy Start – Pop Up Tents

I bought a pop-up tent as my first tent. I went for one of the cheapest options here just to get started quickly. I was able to use it after one week (with the doors all open at first for air) but it was about 1 month before I found it offgassed the chemical smell, and I could close up the doors. I was super sensitive at that time.

A number of brands have pop-up tents in this style which are super easy and quick to put up and have a decent design in terms of the amount of ventilation (more on the style I prefer with ventilation below).

Mine leaked in heavy rain so I don’t like this style of tent, other than the fact that it is very easy to pop up and if you get a good tarp over it you will be waterproof – I always put a tarp over tents now anyway, more on that later.

Anyone super challenged with putting up tents might want to start here.

My simple pop up tent outside of a cod house
My First Tent CC BY-NC-SA

Rain Fly Styles – Preventing Mold and Avoiding Chemicals

a orange tent with a rainfly that comes all the way to the ground

For heavy rain, a tent with a really good rainfly is needed that comes down almost all the way to the ground like many of the REI or MEC brands and this Backpacking tent (pictured left).

I used the Winterial version of this style for many months and was very happy with it. (This brand claims no flame retardants).

When it comes to tents on the ground, this is the main style I look for because of the good rainfall, which keeps it more waterproof.

Having mostly mesh on the inside also reduces your exposure to chemical offgassing and helps to prevent condensation on the walls.

Technically you don’t need a tarp over it, but I always add one. Water that soaks the tent walls will then soak anything that is touching the walls inside. The tarp is also needed so you can get in and out when it’s raining.

I just don’t trust any tent enough to not put a tarp over top. More on setting up tarps later in the post.

Tent Styles and Offgassing

Sometimes the rainfly smells stronger than the tent and sometimes it smells less. Sometimes a super beefy tent bottom is the hardest part to offgas. It depends on the brand.

Some who are trying to reduce exposure to chemical offgassing wash the tents to remove some of the treatments, but this also removes some of the waterproof coating. That can still work if you have a good tarp over.

The more mesh you have the more airflow and the less exposure to offgassing.

Bivy Tents or One Person or Stealth Camping

For stealth camping on patios and balconies of hotels or Airbnbs I have used a one-person tent like this Winterial brand. I also like this Tenton brand (I like that it comes with straps to strap it to a camping cot below to raise it up).

You can also look for tents called bevy tents.

A camping set up on a balcony that is a rainfly strung up with a camping cot underneath
That’s me all tied up on a balcony CC BY-NC-SA

I have tried just a mat with a mosquito net over it (this one is not treated with pesticides), and I have also strung up just the rain fly (with no tent) over a camping cot and Thermarest if there are no bugs.

Otherwise, you can cut out the bottom. Never put a tent with a bottom right over outdoor tiles, bricks, or concrete for long, you will have a recipe for mold fast.

You can put up a tent on top of a camping cot like in the pictures of the Tenton one-person tent linked to above. But to keep a low profile I prefer to use a camping cot and then string up the rainfly or mosquito net so it does not go higher than the balcony rails.

If you have a stable place and are not on the move, I like these garage/deck tiles to lift you off the concrete. I’m trying them out now.

Choosing a Tent Style if you are Putting up a Tent when Disabled 

Make sure you know how (and that you can) put up your tent alone (as well as set up other supplies like a stove) before you get to the campsite. I have shown up to campsites with tents that are defective or missing parts more than once, so I would do a trial run for that reason as well.

For those who are disabled and limited, I made this video on Camping for Those Who Can’t Camp, to try and give some examples of how camping might still be possible for you.

Brands of Tents that are Low in Offgassing

I like putting tents in the sun to offgas them. Smell them to test, and also touch them to make sure they don’t cause skin irritation. You may have to test them by sleeping in them to test for tolerance.

Moonlight thetentlab.com

Brands that seem to be the lowest in offgassing are:

There is no consensus on which brand is the best for those with chemical sensitivities. Everyone is so different, no tent is perfect, and for some less sensitive there might not even be a big difference between the brands. You have to test them out for yourself if extremely sensitive.

For the mild-moderately sensitive:

  • Lightspeed (polyesters with PU coating)
  • REI (polyester, rainfly, and floor coated with PU) has been used by some very sensitive folks.
  • LL Bean (polyester with PU from what I have seen).
  • Big Agnes (nylon, polyester with PU and some silicone).
  • The jury is out on Coleman, some people tolerate it and others don’t.
  • Some people find cheap Walmart tents especially Ozark brand is more tolerable than ones for hundreds of dollars. I have found Ozark tents to be very tolerable myself.
  • Winterial may work for some folks. I used this as I was becoming less sensitive. I like that it is affordable and doesn’t contain flame retardants.
  • Nemo Aurora

For the moderately to extremely sensitive:

  • Cuben fiber tents – Cuben Fibre is PET, this can be more tolerable for the very sensitive but they are more expensive. Many have said these don’t contain FR, but Zpacks failed to get back to me on that.
  • Moonlight by Tent Lab – All FR-free and coated with silicone on the outside and polyurethane (PU) on the inside. This brand is often touted as being better for the chemically sensitive but I have found there is not enough consensus on this. With many not tolerating it. At a steeper price than your average tent, you should test it out first. They send fabric samples.
  • Six Moon Designs – silicone nylon fabrics, very low odor,.

Silicone-treated tents might be more tolerable for some, others may prioritize avoiding flame retardants.

If you are too sensitive for any of these brands there are more options further down in this post for those who have to go more extreme.

12 Tent Brands Without Flame Retardants 2022 

  1. Mountain Hard Ware tents made after 2019 are FR-free ($200-310 price range)
  2. TarpTents ($270-500 range)
  3. Fjällräven tents ($500-1000 range)
  4. Diamond Brand tents ($300-350)
  5. Nemo Chogori and Aurora tents don’t have FR ($700-850 and $250-300)
  6. Moonlight All FR-free and coated with silicone on the outside and polyurethane (PU) on the inside. ($430-600)
  7. Winterial does claim no flame retardants in discussions, although they don’t have an official statement on this. ($100-300)
  8. NatureHike has claimed no flame retardants in private emails and confirmed by factory reps who sell to wholesalers. ($100-200)
  9. Six Moon Designs none of their tents are treated with flame retardants and they have many silicone nylon options (Silnylon) ($270-340)
  10. TETON Mesa Canvas Tents and the Sierra Canvas Tents do not contain flame retardants. The company has given contradictory info on whether ALTOS Backpacking Tents are FR-free ($100-$600)
  11. The North Face all tents free of flame retardants as indicated by their chat (though it’s not clear that is accurate) ($150-$1000)

Some canvas tents do not have flame retardants.

Cuben fibre from what I have seen is FR-free.

I have not found any evidence that many flame retardants can be adequately washed out, but it can’t hurt to try.

Camping Gear without Flame Retardants 2022

  • Thermarest Camping pads don’t contain FR. Some have the Prop 65 warning (but for chromium).
  • The Exped mats are FR free since the 2015 lot.
  • REI brand sleeping mats are not treated with FR.
  • TETON sleeping bags, camp pads, and pillows have been tested to verify that they do meet CPAI-75 standard without adding any fire-retardant treatment to the materials
  • Wildkin sleeping mats and sleeping bags are also FR free.
  • Other sleeping bags that are FR free are Holy Lamb Organics (but they use cotton), Kelty, Wiggy’s, and the down quilts by Jacks ‘R’ Better.
  • All wool sleeping bags by Lucky Sheep (ask them for all wool with no cotton).

Unconventional Tents for the Extremely Sensitive

Aluminum Insulated Tents

These tents have the benefit of insulation, and the aluminum coating reduces offgassing. They don’t do well with humidity inside the tent if there is a warmer inside.

WeatherHyde tents are insulated and the foil on the inside will also block most of the VOCs from the fabric on the outside. They say you can sleep in them down to 0 degrees Celsius. They are 269 USD. They do not have any mesh for ventilation which I imagine would be quite the problem for condensation and I do not know how you would get fresh air.

The Shift Pod is another version of an insulated aluminum tent made for Burning Man. The benefit to the aluminum on the outside is it’s reflective of sun and heat. I would think it would have similar problems with condensation in most situations. It’s pricey at 1300 USD.

For 18 USD you can get this aluminum-lined small sleeping tent (that might work for balcony sleeping or in an emergency, otherwise it’s difficult with a lack of ventilation). The aluminum on the inside is more tolerable than the usual plastic.

Home Made Tents

Others have made homemade tents with materials they can tolerate like Tyvek, Reflectix or XPS sheets. You can also make a more typical tent from untreated nylon.

More info on that in this post here.

Canvas Tents

Some folks who cannot handle the chemicals in the synthetic tents have tried canvas tents.

Some companies people like are Reliable Tent, Kodiak Tents, Davis Tents.

Are they Mold-Prone?

These do not hold up well to rain and high humidity and I would not use them in rainy or humid conditions nor expect them to last very long at all.

I have seen canvas tents, specifically, Davis tents hold up for quite a long time in a dry climate and with a woodstove inside. It can take rain and even snow, as long as it can dry out. For long-term living a gravel floor or a raised-up wooden platform is best.

Hemp Canvas

For those who don’t tolerate cotton or who want the tent to hold up a little longer than cotton canvas, you can make one out of hemp fabric, like this one. You can expect cotton and hemp to last a short while in dry non-humid climates where you are expecting very little or no rain for a while.

If you are making your own tent out of canvas or nylon you can use the tube structure of a conventional tent and build it around that.

Large Wall Tents

Wall tents can be canvas or conventional nylon/polyester. They have straight walls and are generally larger. Barebones makes a nylon polyester wall tent. Often this type has more weather poofing and will have flame retardants because they are set up for wood-burning stores.

This can be a good solution for a longer-term camping tent. Though you should take care to keep the base dry (cut out or raised up) if you want it to last.

How to Stay Dry and Prevent Mold when Camping

How to Set up Tarps Underneath and Over Tents

I bought a tarp for underneath to keep dew from getting the tent wet from below (also called a footprint), and later I added a tarp for over the tent to stay dry.

At first, the bottom of my tent stayed nice and dry with the tarp underneath. I would take out and turn over the sleeping mat every day.

If the bottom of the tent gets wet you will want to dry it in the sun within 24 hours (flip it and then put it back and maybe move spots).

You can use the footprints made for underneath tents but tarps are generally cheaper (your tent may come with a footprint).

You want the tarp underneath to be a little smaller and tucked in so that it is under the tent. No water should get between the two. Some people tuck it and then raise it a little with sticks or rocks so that no water gets in between. I tried that but in the end tent bottoms still went moldy on me if I had damp soil.

Putting a tarp overtop helped a lot. I found regular tarps from the hardware store has a strong smell but offgassed within a few days.

I now use a silnylon tarp which has a less offensive odor, and is more durable but is more expensive. Over most tents, you need 12 x 10 or 12 x 12.

Some people find they still do have to move the tent every couple of days due to condensation or the earth going funky underneath.

A blue tarp strong up between two trees over my orange tent.
One of my many tarp setups CC BY-NC-SA

Mold Avoiders! Keep a backup tent that is offgassed in case of mold or damage to your primary tent. Keep backup gear especially if you are out in the wilderness, if you need geat to offgas before using, or you cannot easily drive somewhere and buy new gear within one day.

Generally, you string up the tarp up in an “A shape” so that it’s touching neither the tent nor the ground, you can also string it up with a shed slant like the photo above.

Some people dig a small trench around so that the water that drips off does not go towards the tent.

Without a tarp, I had a lot of problems including saturation of the tent and water coming through especially where anything was touching the tent. I would not attempt camping without a tarp overhead again.

In a major storm, a larger tarp overhead helps, as well as a deep trench, and if things are going swampy you need to raise it up. I have used XPS sheets to raise up a tent in a storm before I found the Cot Tents.

The Solution to Tent Bottoms Going Moldy – The Best Tents For Avoiding Mold

A blue tarp strung up on an angle between trees over my cot tent
The Ozark Trail Cot Tent CC BY-NC-SA

After throwing out many tents and then moving on to cutting out the bottoms, I finally found what seems like the perfect tent: the Ozark Trail Two-Person Cot Tent. Unfortunately, it looks like it was discontinued in 2020.

This style of integrated camping cot tent (pictured) is really the most ideal setup in my experience This is off the ground so the bottom will not mold.

This had a very low odor rainfly and a brilliant design with the rainfly coming down way past the cot to protect water from getting in between.

Although I didn’t like the more common style of tent cot (I had trouble with ventilation and even dangerously spiked my C02 levels one night).

A small cot tent for one person

It was the Kamp Rite brand that I tried in this style. The Camp Rite brand does have a two-person version.

I quite like the Tenton tent that is made to strap on to their XXL camping cots.

You will, as always, want a tarp over this whole setup since this rainfly does not come past the cot (though on their website they sell a larger rainfly which would).

These cot tent brands are coming and going. I’m not sure if it’s a lack of demand which is a shame because for mold prevention these are ideal.

Other Raised off the Ground Tents

The tree tents look interesting, as they are raised off the ground, but you have to keep in mind these are really just for sleeping as they don’t look very conducive to hanging out all day. I wonder how much they sag in the middle, and they are not as easy to put up.

For those who are less picky about their sleeping environment resembling a regular bed, the hammocks with nets are interesting options that are affordable and easy to travel with.

Downsides of Cot Tents

Cot Tents are Bulky

While I would never want to go with anything other than the raised off the ground tent again, this won’t work when I travel overseas. When I travel I need to fit a tent, sleeping mat, and sleeping bag into a duffel bag.

The sleeping mats I use are huge and unless I can send a tent ahead I would have to go back to cutting out the bottom. I would use plastic bags to encase the sleeping mat, instead of the thick tarps I mention.

Cot Tents are Colder

It is cooler when you are raised off the ground. But I don’t find it any worse than cutting out a bottom and using a camping cot (in fact I find it warmer than tents with the bottom cut out).

Flame Retardants

Ozark is a very tolerable brand for MCS. I don’t like the flame retardants they use. I have not seen a flame retardant free brand in this style.

Should you Buy a Cheap Tent or Tent that Lasts?

For those doing mold avoidance or living somewhere very damp, you might want to go with the more disposable option.

Expensive tents from REI and MEC tend to pack smaller and lighter and should be of higher quality, however, if they do go moldy it is a bigger loss.

On the other hand, if I am traveling with a tent I want one that’s not going to break unexpectedly as many places around the world do not have stores that sell tents. Check also how much wind and rain they say they can withstand. You pay more for quality wind and rain protection.

But all of that said, I would never spend more than 150 on a tent unless I’m sure it’s going to last me a long time (like the ones raised off the ground).

Camping Mats – Low Offgassing 

Air Mattress

A turquise air mattress made of TPU

I started with the Lightspeed air mattress made of TPU, which is the one the folks most sensitive to chemicals use.

It offgassed quickly (2 days in the sun) and felt comfortable. It’s good quality, but I had back problems with it. This can happen to some people on air mattresses.

Many with chemical sensitivities prefer the Intex polyester air mattresses.

Inflatable Sleeping Mats

a beigh inflatable camping mat

Other very sensitive folks have tolerated the small air mats. I was very impressed with how little this one smelled (less than the air mattress), and it’s a WAY better option to travel with, but I did not find it comfortable enough.

Someone much more sensitive than me recommended the Klymit Static v which comes uninsulated and insulated (with what looks like polyester fiber, not foam).

Go with the simplest, most compact option that is still comfortable for you.

Open Cell Foam Self Inflating

A mondo king thermarest (blue)
The Mondo King

I ended up buying the thickest Thermarest instead and LOVING it. This is as comfortable as a bed to me, though many people put Thermarests over a camping cot, that seemed excessive with the MondoKing (though cots can also help you get off the ground which is a benefit when you have cut out the bottom or are preventing mold under the bed).

I’m not that picky about beds so I was surprised that the airbed hurt. The Thermarest has a decent R-value to keep you warm, the more insulation you have under you in the cold the better.

The MondoKing is very comfortable and I usually wake up forgetting I’m in a tent. It has polyurethane in it but it offgassed quickly in my experience. I used it after 2 days of airing out (not ideal), in one week I found it to be really good, and one month to be near odorless to me.

This is a super good mat for a trailer or other tiny home as well. It does not contain flame retardants.

I bought the repair kit for the Thermarest as well because this is going to be my main bed in the trailer, I also carry the repair kit when traveling.

I still prefer the MondoKing, but another good and more affordable (but thinner option) I use is the Lightspeed version.

Camping Beds and Moisture

When it was hot and sunny (and I was not self-contaminating) I had no problems with condensation if I turned it every couple of days and some days left it standing up to air out.

You will want to flip or air out your sleeping bag as well in the day to prevent mold.

As it got cold and I moved it into a trailer it became very challenging to keep a sleeping pad dry and mold-free. It needs to have slats underneath and a waterproof cover without a doubt in a cold or damp environment.

I wouldn’t recommend leaving this on any flat surface without a waterproof cover anymore. As I got more sensitive I was not able to keep this clean without an encasement.

If you are very sensitive to mold, very unmasked, or detoxing through your sweat, encase the sleeping mat right away. You can use plastic but I prefer these thick aluminized tarps as they also block the smell.

I used those tarps if I needed to block the smell but if I just needed to encase it I used contractor bags that are thicker than the usual garbage bags. I taped it airtight.

Closed Cell Foam Pads

a closed cell camping mat with silver on one side

For those ultra-sensitive to chemicals, an aluminized Thermarest is the safest camping mat.

People usually go with the solid foam or the small inflatable ones as they pack much smaller than the deluxe one I bought (and these are more affordable). They offgas less as well.

You can wash these unlike many of the other options. Some even pour boiling water on them to clean them and kill bacteria. You can’t do that with all camping mats.

Camping Cots

I like this style of camping cot the best because it packs really small, it is relatively flat, works well with a Thermarest over it, and it’s low to the ground but high enough to have airflow.

I never put a camping mat straight on the ground anymore. I always want that airflow under the sleeping mat (if you are not using an integrated cot tent).

I would not say this style of camping cot is easy to take apart and put back if you are physically disabled.

The Coleman polyester camping cots do not have a water-resistant coating so they may be safer for the very sensitive.

Bedding – Low Offgassing

Sleeping Bags

I’m extremely pleased with this Teton sleeping bag which is warm and offgassed after sitting in the sun for a week or so. I never even washed it.

I used this in the summer and some days it was too warm.

Many who are super sensitive to mold and chemicals use the Suisse Sport Alpine sleeping bag.

Sleeping Bag Liners

Others like a silk sleeping bag liner which keeps you warm and keeps your sleeping bag cleaner. It is much easier to wash a liner than the sleeping bag. I’m using this silk one and it’s quick to dry (surprised by how chemically it smelled, needed more washes than most fabrics).

You can also make a liner by sewing a queen flat sheet in half. You can either use a liner to get inside of first or to encase a blanket. This will keep the sleeping bag good for longer. The polyester liners can work too.

Blankets instead of sleeping bags

In warmer weather, I skipped sleeping bags and used heated blankets as my only blanket. As I started to detox through my sweat things got trickier.

Now I like a warm but washable option like these Pendleton Blankets. But, when it is very cold, a sleeping bag is really the warmest option.

Sheets

I use these AmazonBasics polyester sheets. But there are specific sheets for Thermarests and other brands of sleeping mats. They are also polyester, the only difference is they are fitted exactly for the Thermarest.

You don’t want any cotton in your tent – it doesn’t do well outside for long if it’s humid, and it’s terrible when wet.

Pillows

I bought a polyester camping pillow which is small (and it has cotton on the outside!)

I use waterproof pillowcases to prevent mold which I aired out and washed before using. They do smell at first, but polyurethane coating does offgas (to most people’s standards).

I have tried lots of camping pillows from the air and foam ones to the polyester ones, to just using a towel.

Someone super sensitive recommended the inflatable Klymit Pillow X.

You have to figure out which is the most comfortable for you. Some are very small. The air ones can be easy to roll off of. A towel is easy to wash if you need to wash gear often.

I keep backups of everything.

Staying Warm and Cool

Heated Blankets

I use a heating blanket in almost every climate. I thought the biggest problem for me would be stabilizing my temperature, but that ended up not being that difficult at all.

This is the Sunbeam heating blanket I use. After going through a lot of these, the trick is I want one big enough to cover me and I want the 10-hour shut off not the 3-hour shut-off, to keep me warm all night.

They are challenging in how strong they smell when new and since they can’t go in a dryer they can be difficult to clean in cold weather camping.

I encase my current one in these liners and wash the liner every 3 days.

For those concerned about EMFs, you can use this to heat the tent without putting it on your body. It won’t be as warm, but it is likely safer than a stand-alone heater in a tent. Or, the fancier and supposedly healthier option is an infrared mat.

This 60-watt heated blanket (the smaller throw size) will run for most of the night off this solar kit. I always have an extension cord running to my tent. A small heated blanket tucked into a sleeping bag provides a lot of warmth.

Using a Heater in a Tent

I have set up many a small heater in a tent. I check the wattage and if it has temperature control (I make sure my tent is big enough, note: read the tent dimensions carefully, they run small).

It’s safer to place the heater up on a small table or round of wood to keep it from knocking over or blowing directly onto something that could melt or burn. I make sure my tent is big enough to accommodate a heater with lots of space around it and it has an auto shut off when it falls over.

I use this little Honeywell heater because it’s super low wattage (250 watts).

I find it easy to accidentally shove this when sleeping and it can turn towards the tent fabric easily. That is just one reason why this is not technically recommended. It is a fire risk. This is what I have done, but I cannot officially recommend it.

If my tent is on the ground and I have a thick Thermarest, I can be warm enough with a heated blanket and that little heater down to 5 degrees C. I don’t sleep well when I’m cold, but everyone is different, so you will have to work out those details.

Other Heating Options

  1. Hot water bottles can be put inside the sleeping bag at night. This thermoplastic one has been reported to be very tolerable by many.
  2. Hand warmers work well when you don’t have electricity. Hand warmers in your sleeping bag can be a big help. The same company also makes sock liners. I have used these in power outages, they seem totally non-toxic.
  3. Heated clothes like battery-powered heated jackets, socks, and gloves can be a huge help as well.
  4. Wood stoves are used by some. I’m getting the Cubic Mini for the cargo trailer but I do not have experience setting up a wood stove in a tent.

Cooling a Tent: AC in a tent 

For the AC you will need to cut a hole for the exhaust and seal with tape around it.

If I put anything electrical in a tent I make sure I have multiple layers of protection from getting wet from above or flooding from below.

Use heaters, heating blankets AC, or woodstoves at your own risk of fire or electrocution. They are not recommended for tents.

Here is the longer version of my Amazon visual list of my Favorite & my Unusual Camping supplies I bring with me on a Sabbatical.

(See the comment box on each image to see my notes on each one).

A few examples here:

  • Pressure Cooker: I cooked everything in an Instant Pot when camping which I could do on my one extension cord.
  • Water Filter: Travel Berkey is still on my wish list, this ceramic filter is ideal for well water or any other water where filtering for biological pathogens is the priority (otherwise I buy water).
  • Towel: Non-cotton fast drying travel towel, I use this one.
  • Earplugs: For really loud situations the “triple down” method of foam + silicone + ear protectors (or noise-canceling headphones). The construction ear protectors do smell quite strong. One benefit of noise-canceling headphones is some noises cannot be blocked without adding white noise.
  • Eyemask: The foam contoured eye masks smell a little and need some time to offgas (I put them in the sun). It is still my favorite mask many years later. The fabric ones can be washed to remove chemical treatments. I always keep a backup mask.
  • Clothes Dryer: I still love this portable dryer, I got a tonne of use out of that. I used it outside with an extension cord, undercover. If you are in an RV a heated towel rack makes a good indoor dryer.
  • Clothes: Washable wool or silk long underwear, wool socks, and wool hat, gloves to stay warm in cold weather.
  • Hand Sanitizer: Hand sanitizer (that’s my favorite non-toxic brand) and baby wipes are essential in a tent (unscented of course, for yourself and also if there are bears around).

More Resources:

  • My guide to a mold sabbatical
  • Avoiding flame retardants
  • EI Wellspring Safer Camping – How to choose a campsite with extreme MCS

Corinne Segura is a Building Biologist Practitioner with 7 years of experience helping others create healthy homes.

I spent 2 years living outside in tents in order to bring down my chemical and mold sensitivities and get back into regular housing.

Did you find this post helpful? If so you can buy me a coffee to support the research behind this blog. Thank you!

Buy Me a Coffee at ko-fi.com

Filed Under: Mold Avoidance Paradigm, Tiny Homes and Trailers Tagged With: camping, mold avoidance paradigm

Campsites in the Caribbean (A Complete List)

January 3, 2021 by Corinne 2 Comments

It’s oddly difficult to find campsites in the Caribbean by Googling. Though not the most popular camping destination in the world, I did find with a lot of digging, a good number of proper campsites where you can pitch a tent.

The focus is on both dedicated and unofficial campsites where you can bring your own tent. Many of the same spots also have tents that you can rent.

I did not include glamping in this post. I plan to do a separate post on glamping in the Caribbean.

This post contains affiliate links. Upon purchase, I earn a small commission at no extra cost to you.

Alternative Places to Camp

Camp in a Yard

Of course, you don’t have to have a dedicated campsite to camp. In some countries, it’s perfectly acceptable to camp in a yard, on a balcony or roof.

I did that in Cuba, a country that does not have any official campsites. I set up my casita de campaña in all sorts of places at BnBs.

You can do this just about anywhere, especially if you rent a yard that is big enough to stealth camp.

WWOOFING

WWOOFING is a work trade website. You can find farms or ecovillages where you can volunteer your time in exchange for usually a free stay (lodging and usually food too).

Very often the lodging provided is a spot to tent camp.

The labour required is most often physical labour, but it can be administrative labour too.

I have also contacted many farms (both WWOOFING and other private organic farms) to ask them if I can pay a monthly fee to camp there – many said yes.

HipCamp and AirBnB

HipCamp is a site offering private spots to camp, and since the pandemic Airbnb hosts have listed more private properties on which you can camp.

If you are new to AirBnB this is a discount link for $40 USD or 75 CAD off.

You can get $10 off Hipcamp with this link.

The Locations Effect

For those following the Locations Effect Paradigm, you have to analyze these campsite by campsite. We cannot generalize on a whole country, though there are some islands that are so small that it may make sense to generalize. We don’t have reports from every country/area, though I give my true thoughts on these areas at the bottom of the article.

What you NEED to know before heading to the Caribbean to camp!

  1. Confirm everything – if they are open, what are the rates, do they have wifi, etc. before going with the campsite! Things could change between asking and when you get there too! Don’t depend on the website being accurate. Everything is less official in the Caribbean.
  2. Flexibility on where you can camp – Along with changes for the worse, you are also likely to find flexibility with camping at places that offer simple cabins or anywhere not too formal. Just ask!
  3. Ask for direct pricing (not through the hotel booking apps).
  4. You can’t buy camping gear in most of these areas (though many sites rent it out). Come prepared!
  5. There is a lot you need to know! Get the Lonely Planet book for each country you are considering and do your research. It’s a must! Things are different than in The West/Global North.
  6. If you have environmental sensitivities there is even more you need to know and you can find yourself with very unwelcome surprises like toxic seaweed, excessive charcoal campfires, moldy tents, parasites in food and water…….. my post on traveling with sensitivities covers this.

Campsites in Puerto Rico

Isla De Mona, Puerto Rico
Photo by Ricardo Torres on Unsplas

Because Puerto Rico is an American Territory it has more campsite options than most islands in the Caribbean.

You can also buy camping gear locally, something that cannot be said in most parts of the Caribbean – they have Walmart, Kmart, Sears, Sams, and Costco.

They also are the only island I know of with RV parks.

Government Campsites in PR are closed during the second wave of the pandemic, but they will reopen in 2021.

There are 11 private campsites on HipCamp for Puerto Rico ranging from $12-200 a night.

1. Vieques Island

There is a campsite on Sun Bay Vieques, a beautiful island off the south coast of the big island, in a National Park (Compañía De Parques Nacionales).

The campsite has a cafe for food and drinks. Tent sites are in a flat, grassy, fenced area just off the beach.

The campsite has bathrooms and outdoor showers. They have security overnight.

$10 per night per site.

2. Culebra Island

The only campground on Culebra is the right on Playa Flamenco. It is managed by the Department of Natural and Environmental Resources.

This spot looks quite pristine and the beaches are really pretty.

$30 per tent per night. ($20 for senior citizens and people with disabilities).

3. Caguas

Mi Casa Eco Camping is a private camping “resort” inland in central PR. They have tents set up that you can rent.

They have bathrooms, showers, a shared kitchen, wifi, and community activities.

This is a well set up place to camp and I like all the communal activities.

$25 a night.

4. El Yunque National Forest

El Yunque National Forest a USDA Forest Service park has dispersed and group camping sites. Camping is permitted at designated campsites only.

Campfires are only permitted at Molindero and Old Nursery, in designated fire rings. Cookstoves fueled by butane or propane are permitted.

There is limited cellular service in the forest (don’t count on it working), and there are no washrooms.

Some have reported very difficult camping conditions (like severe mud).

Camping is free, but you do need a permit. There are stay limits.

5. Seven Seas Beach in Fajardo

The calm water turquoise Seven Seas Beach allows camping and has washrooms and showers.

The beach has shelters and camping spots (you need a permit prior to arrival). The local police act as security for the beach.

Call first for sure to check up on if they are in operation.

$10 a night.

6. The Toro Negro Forest Reserve

A State Forest, Toro Negro offers camping.

You can only get here in your own rental car and you need to make prior reservations. You can get a permit in the capital city.

Camping facilities include bathrooms and waste disposal.

$4 a night.

7. Isla de Mona

You can also check for WOOFING and other volunteer opportunities where you can camp like Las Maria’s Project Farm on Isla de Mona.

Campsites in Mexico

Tulum, Mexico
Photo by Tanja Cotoaga on Unsplash

1. Holbox Island

Balam Eco Camping is a cute little campsite with spots to pitch a tent and little simple cabins. They have shared space like picnic tables, an outdoor kitchen, and simple bathrooms.

On google listings it is showing that they do have wifi.

It’s not clear if the rates are for renting a tent or for bringing your own tent.

$10 a night for one person (as indicated on booking.com)

One Love Camp is another nearby campsite, very similar to Balam Eco Camping. They have tents for rent and I would think that you can bring your own too.

They have little basic cabins, shared kitchenette and shared bathrooms.

Aldea Camping like the two above has tents to rent and little cabins as well as shared spaces. This one is very close to the beach.

Kin Camping is similar to the others. This site has tents already set up, it doesn’t look like they have space for extra tents.

Glamping Holbox sunset, similar to the others but reviews say it’s particularly loud. (All of these packed in campsites in Mexico should be assumed to be fairly noisy at best).

Message them for the prices. (All these spots on Holbox are probably similarly priced).

2. Yucatan

Just across the water from Holbox on the mainland is a campsite Camping del Ritmo.

A site close to the beach. They have a campfire area, shade palapas that you can put your tent under, a well-equipped kitchen with 2 bathrooms, hammocks, tables and chairs, and wi.fi.

Contact them for the costs and for booking.

3. Cancun

There is a full-service RV park west of Cancun if you are traveling in a van or RV. It’s a basic site, but they offer full hook-ups, wifi, a small pool, restaurant, cabins and it seems tent sites as well, an outdoor grill, simple dishwashing area.

The rates are not listed.

4. Xpu-Ha, North of Tulum

North of Tulum in Xpu-Ha there is a full service RV park. It’s also possible to camp on the beach there.

For full hook ups it’s 15 USD a night. Contact them for tent camping costs.

5. Tulum, Playa Roca

If you want to camp right next to the beach, Playa Roca is a good spot. This is a lot more spacious than the sites on Holbox, but it is simple.

It is quieter than the spots on Holbox too which are quite packed. At this site you can definitely bring your own tent, though they do rent them out as well.

They have shared showers and bathrooms and a kitchen. There is no electricity and no wifi.

100 pesos per person per night ($5 US)

Arena camping next door sounds like they share the bathrooms with Playa Roca and they don’t have their own kitchen. Though they do have large tents that are already set up for you to rent.

Rates are not listed.

6. Tulum, Camping Chavez

Camping Chavez south of town is a great spot to camp on the beach. A little more established than the other sites they have a shared outdoor kitchen, bathrooms with hot showers, and electricity in the common areas. The little shelters, and cabanas that look very simple and clean to me. They also have wifi!

Booking.com is showing the price at 37 USD for a single tent (which looks like renting their tents and bedding).

7. South Tulum, Sian Ka’an Ecological Reserve

Lastly, a bit of a hidden gem, El último Maya, is remote, secluded, and beautiful. It’s within a nature reserve so you can expect to get away from the usual pollution in Tulum.

Personally (for the Locations Effect) I would want to get out of Tulum.

They don’t have a website and there isn’t a tonne of info on them but the photos are beautiful and you can camp there. There is a restaurant, showers, and bathrooms.

Reviews say they do not have electricity.

You can’t cook your own food here so you would be relying on their restaurant which sounds pricey (at least some items). One reviewer says it costs 50 pesos for cold beer, 35 pesos for soft drinks, and 250-300 pesos for a meal.

No bonfires are allowed.

350 pesos a night (around 18 USD) if you bring your own tent.

8. Mahahual (Southern Caribbean Coast)

Eco Camping La Mar is a sweet little campsite in this more remote area.

They use solar energy and collect rainwater. There is a common kitchen in a concrete building, storage area, and bathrooms.

They have a little cabin but most spots are tent spots.

They are not taking bookings as of winter 2020/21, but check back post pandemic.

Further south there is another campsite called El Xahuayxol. Their website is also down but they do have very recent reviews. Contact them for more info and rates.

It was listed on Booking.com as 25$ a night.

9. Lake Bacalar (Southern Mexico)

There are number of campsites in this area including Gris Monkey campground in Xul-Ha, Ecocamping Yaxche, DelMar Camping, Camping Bacalar/Magic Bacalar.

At Magic Bacalar they have cabins and tent spots. You can rent camping gear or bring your own.

This is a well developed site with common spaces, palapas, a kitchen, lockers and wifi.

If you bring your own tent it’s 180 pesos per night. (Currently that’s 9 USD)

What to Know About Mexico:

  • It’s best to know some Spanish outside of high tourist areas.
  • Life is more flexible, be sure to confirm all the details with the site first. You can bargain on rates.
  • Look into health (food and water can make you sick) , mosquito-borne illness and COVID restrictions, sourcing specialty foods and medications, MCS triggers like pesticide spraying, charcoal grills, sargassum seaweed, and garbage burning. You can’t import supplements to Mex.
  • The Lonely Planet has a main Mexico book and one for the Yucatan.

HipCamp has 3 sites in Mexico starting from $2 a night.

Campsites in Belize

A Caye in Belize
Photo by Nathan Shurr on Unsplash

1. Sarteneja Village, Northern Belize

Backpackers Paradise is a cool organic farm with some great little cabins, a communal kitchen, wifi, lockers, and a communal room with hammocks.

I think this spot looks lovely.

You can bring your own tent to camp or rent a little cabin.

It’s a 5 minute walk from the ocean, and is very close to the border with Mexico.

If you are new to AirBnB this is a discount link for $40 USD or 75 CAD off.

Camping is listed at 10 USD.

2. South Water Caye (45 min off the Mainland)

Private island alert! Bamboo Belize is on it’s own 15-acre caye. While you don’t get the island to yourself (unless you are a party of 12), it’s still pretty cool.

A fairly remote island, there is no wifi, no hot water, they say to bring solar chargers.

Camping is 25 USD a night.

3. Saddle Caye South

Another private island! Kayak Belize operates off Saddle Caye South. They can arrange for camping on other islands.

While clearly this is focused on kayaking they do offer campsites for tents.

Camping with no gear rental is $5 per night. Be sure to check in on other charges.

Those are the Belize campsites that are on the Caribbean sea. There are other campsites in the jungle as well like Chateau De Pradines, and quite a few others that don’t have much of an online presence. Belize is a good country to find little simple cabins for rent.

What to Know about Belize:

English is the main language in Belize.

It’s more expensive than Mexico and Guatemala.

Be sure to look out for the same safety and illness concerns as in Mexico.

Belize City is notorious for crime, but if you’re reading this you already probably wanted to get out of there asap.

Campsites in USVI

St John, US Virgin Islands
Photo via campstjohn.com

1. St John Camp

On St John island in the US Virgin Islands, Camp St John is a beautiful campground up the hill looking over Caneel Bay.

The campground has a community power source, bathrooms with running water, an outdoor camp shower (not heated) stocked with toiletries, a stocked coffee station, an electric griddle, silverware, and dishwashing supplies, potable water, and a cooler for community use.

This is USVI, nothing there is going to be cheap. But if you want an American Territory and a more economically developed island (and everything that comes with that from less disease to safety) this is the cost of that.

$55 per night if you bring your own tent.

2. Cinnamon Bay Resort & Campground, St John

In St John, this campsite is still be rebuilt from the last hurricane (as of winter 2021).

They used to offer simple cabins and tent spots.

They plan to reopen at the end of 2021.

3. Mt Victory Camp on St Croix

An 8 min drive up the hill from Rainbow beach is Mt Victory Eco Camp. They offer bungalows and tent camping.

For the tent camping option, you bring your own gear. Tent sites are in the open air and within the forest.

Campers can have access to open-air showers (with hot water), bathrooms, an outdoor kitchen with a fridge, gas stove, sink, dishes, and cookware, outdoor areas like a campfire pit and shaded picnic tables.

Wifi is available (and included in the price).

They also offer workshops that look interesting.

$30 per night

This US territory has three main islands – St John, St Thomas, and St Croix.

There isn’t much camping in the USVI so don’t count on having many backup options.

If you want a safer location and are willing to pay more, this is one of the only more upscale islands with camping.

Apart from the options above, there is one camping spot (with no amenities) on HipCamp.

You will see the options above plus a couple other options on Airbnb.

Campsites in The Dominican Republic

Samana, Dominican Republic
Photo by Jean Estrella on Unsplash

1. Barahona (South Coast)

Near Barahona, there is a campsite for surfers called Camping surf Bahoruco. They don’t have a website but they do list a phone number. Use Whatsapp to message them.

2. Jaragua National Park (South Coast)

This national park nature reserve has an exceptional true turquoise beach. This is likely the most spectacular beach that you can camp on in the Caribbean.

There isn’t much official information about camping there but many photos and google reviews of folks camping there.

I imagine there are no services, this is camping in the wild. They have a phone number.

The prices (and stay limits) are not clear but one reviewer said it’s $3.

3. Close to Jaragua

If you need to escape to somewhere more comfortable close by, Glamping Cueva De Las Águilas is near the national park.

They only have tents that are already set up, and this makes it a much pricier option than most campsites.

The tents have electrical outlets, washrooms are shared, there is a restaurant (you can’t cook your own food). It doesn’t say if they have wifi but I would expect so.

$53 per night for the least expensive tent.

3. Parque Nacional Francis Caamaño

Further east on the south coast towards the capital, Francis Caamaño National Park does appear to have campsites but there is no further information online.

Call them, contact local people or check guide books for more info.

4. Samana (North Coast)

This is a thatched dome that is already set up on a 4 acre mountain property in Samama overlooking the ocean. Just 5-10 minutes from Playa Coson.

You get the property to yourself other than the owners who live downhill.

There is a camping toilet as well as a outdoor camping shower. No kitchen. There is electricity for charging your devices and for lights inside the dome. There is cell service. Wifi is available only down near the owner’s house.

If you are new to AirBnB this is a discount link for $40 USD or 75 CAD off.

$33 USD a night.

5. West of Semana on the North Coast

There are a couple of other sites on the north coast that might have camping but it’s not very clear and they don’t have websites. Afuera Camping Club, and River and Woods (which isn’t that close to the beach) are two. You would have to contact them to see what they offer.

6. In the Interior Forest

There is a campsite at Spirit Mountain, an organic coffee farm in the interior of the country. It’s secluded and beautiful.

It has a few shelters, outhouses, potable water, sleeping pergolas, and a kitchen with a wood-fired bread oven.

It looks like the pandemic might have been a hit to this campsite but you should contact them to find out if you can still camp there.

There are a lot of similarities to Mexico here.

Spanish is needed outsidee of tourist areas.

The DR is a very popular tourist destination, tourist and expat areas are weell developed, that means you can find many of your North American products.

Unlike Mexico you can import supplements.

Campsites in The Bahamas

The Sivananda Ashram Yoga Retreat, Paradise Island, Bahamas

The Bahamas don’t have any official campgrounds and you can’t camp on public land but one place you can camp is at a yoga retreat.

Ashram Yoga Retreat, Paradise Island

The Yoga Vacation program is included in their all-inclusive accommodation rates.

This includes vegetarian meals, yoga classes, satsangs, and daily workshops, as well as access to the beautiful beach, ashram grounds and amenities like shared washrooms.

For tent space only: bring your own tent, bedding, and towels.

$65 a night for the tent camping rate.

Campsites in Antigua and Barbuda

Rendezvous Bay Beach
Photo via https://rendezvousbay.com

1. Rendezvous Bay Beach, Antigua

Not an official campsite, Rendezvous bay is part private estate (under development) and part of the Antigua and Barbuda National park.

The 330-acre park is difficult to access either by a long hike or 4 wheel drive vehicle, but it sounds like it’s well worth it.

Locals camp here and there are a few other mentions of camping here. You should connect with the National Park or local people to find out the rules and norms before camping here.

There are no services at the park for camping, but as you can see from the above photo it’s beautiful and looks pristine.

I do not believe there is a fee to enter.

2. Frangipani, Barbuda

This camping and glamping site has one little cabin and spots to tent camp.

You can bring your own tent or rent equipment there (tents, camp beds, ice box, and sheets).

The site has running water and an outdoor toilet.

They have reopened after the pandemic shut down.

Message them for rates.

Campsites in Jamaica

Holywell Park Jamaica blueandjohncrowmountains.org

Holywell Park

In the highlands of Jamaica, Holywell Park is part of the Blue and John Crow Mountains National Park.

Campsites feature BBQ grills, water, shower and toilet facilities. You can bring your own tent or rent one of theirs.

At this higher elevation you will have more pleasant temperatures.

$10 per night

Campsites in Barbados

Barbados campsites, photo via http://campingbarbados.com

Camping Barbados

Camping Barbados operates 3 campsites throughout the island.

They operate one campsite on the south coast near Silver Sands, one in a tropical forest site in the heart of Barbados (St Thomas), and one east coast site near Tent Bay.

They also have urban camping spots around the island, ideal for solo travelers and small groups.

All but their Tent Bay site have a live-in host on the property.

You can bring your own tent, rent a ready pitched one, or rent a tent to use off site. 

Their pandemic discount is excellent. If you bring your own tent the rate is $5.00 US per person per night.

Sites with private bathrooms available. They have on-site security and 24/7 on-site personnel. Meal plans are available.

$5 per night during the pandemic

Campsites in Guadeloupe

Guadeloupe Photo via Hamac Camp

Hamac Camp

Hamac Camp Guadeloupe is five minutes up the hill from the beach La plage de Malendure. This place looks so cool!

They provide the little shelters that have hammocks, duvets, and sheets and tables, and chairs.

They also have a little stove, dishes, and coffee maker.

Shared spaces include a campfire area, outdoor toilets and showers.

This is a French overseas territory.

25 Euros per night

St Maartin and Panama camping coming soon!

The Locations Effect

It’s hard to summarise the location effect by country here because we have limited reports especially from experienced avoiders who generally prefer to stick to the US.

But I’m going to try to summarise:

PR

We have some good reports from the islands off the south east coast of puerto rico. Buildings in PR are especially bad for the region though, leaving back up options very very slim.

The DR

We don’t have reports from unmasked avoiders, but we do have some good reports. A fairly large country I definitely expect some good locations here. The campsite in the nature reserve looks wonderful though not practical.

Mex

We have the most reports from Mexico. I feel very confident in saying that the Caribbean coast of Mexico is so-so (esp around the tourist areas). With a few people making substantial recoveries but those unmasked having a hard go at it, I feel quite sure of this being so-so. (Also, I’ve been there). Mexico is a large country though and I don’t think we have any reports from the more remote areas.

Barbados

We do have one bad report from Barbados and personally, I don’t think there would be many good locations there.

Now based only on factors from other countries and my intuitive approach to locations:

Guadeloupe looks like it could be really amazing; the beach in the nature reserve in Antigua looks wonderful; I like the little communal site in northern Belize but the rest of the country I’m pretty wary of.

I think USVI might be better than we think, but I’m not sure. I think if someone has the money and wants the safety and lack of disease (mosquitos, parasites) it could be very worth it. Many of the mountain campsites in the jungles look good to me. There is one is the DR. I’m not sure about the others.

Buy Me a Coffee at ko-fi.com

Did you find this post helpful? If so you can buy me a coffee to support the research behind this blog. Thank you!

Filed Under: Mold Avoidance Paradigm Tagged With: camping, mold avoidance paradigm

Emergency Housing for Chemical and Mold Sensitivity MCS / CIRS

April 2, 2020 by Corinne 21 Comments

Emergency Housing for those with Chemical Sensitivities (MCS) and Mold Sensitivity

This post contains affiliate links. Upon purchase, I earn a small commission at no extra cost to you.

Here is a list of some housing ideas for those with environmental sensitivities needing immediate or temporary safe housing.

KOA Cabins

KOA cabins are located across the US and Canada. The cabins are made from mostly safe materials (mostly wood) and have been reported to be good places to stay for those who are environmentally sensitive.

Ask if the wood has been stained recently. The bathrooms are separate and may or may not be mold-free, depending on the location.

Recently I’m hearing reports of these having gone moldy. If the foundation or roof is not done right there is a high chance these could go moldy. Often newer is better for mold.

Home Made Tents

Regular tents can be difficult because of the chemicals used on the fabrics, the lack of insulation and the tendency for them to go musty very easily and be a lot of work with the airing out and drying out.

I have a preferred tent which is an off-the-ground tent in my post on camping gear. Here are some alternatives:

Reflectix Tent 

Reflectix provides some R-value and reflects light so that should work in a lot of different climates, though the seams will reduce the insulative value and add more glue and more potential for leaks. There are simpler designs for the structure that will reduce seams.

You can’t buy these – you would have to look online for the metal structure, then buy the Reflectix, foam, aluminum tape, and duct tape and then have someone make it for you. The tape may make this intolerable for some. And this also lacks airflow. 

You would also make at least one triangle out of polyethylene or an EVA Shower Liner so that you have some light. But have a flap of Reflectix over it that you open and close over this “window”.

Plastic Tent

A woman sitting outside of a tent that she made from Tyvek plastic
Kim’s tent via Paradigm Chage.org

Kim was severely sensitive to chemicals. She made a tent out of Tyvek which she tolerated well when extremely reactive. She explains how to make it here. Through extreme mold avoidance, Kim made a full recovery.

This is a plastic used as house wrap.

There are so many options here on what you can build an emergency tent out of. It all depends on what you can tolerate.

It may not last forever but it may give you some time to find another option or even bring down your MCS which will open up options. 

Other materials you could use: polyethylene, tarps, even hemp fabric if you are not expecting rain and don’t have high humidity.

Foam Tent

A A frame foam box that I set up inside my cargo trailer for sleeping in

When Sara was an extreme reactor (also now recovered), she made a simple structure out of XPS foam boards. The two-inch boards of XPS (usually Owens Corning brand can be found easily) have a high insulative value.

She arranged them in a tent shape, the groves in the edges holding them together. Rocks at the base pressing them together. Of course, you could use tape if you can tolerate that or put plastic over the whole thing.

Above is my version made of polyiso foam. This is a “foam tent” used inside a non-insulated trailer that was cold and still offgassing.

I hooked up a Panasonic ERV and ran fresh air into the tent at night via a 4-inch aluminum tube. The opposite end of the tent had a 4-inch hole for air to exit.

This is a highly effective way to deal with offgassing – fresh air is pouring through, though it can be difficult to control the temperature and humidity this way. 

Coroplast Tent

This Youtuber built a foldable shelter out of the safer plastic Coroplast. The downside is the amount of tape needed to form a shelter like this.

Simple Wood and Foam Shelter

The actual wood frame which was the cover of my foam shelter

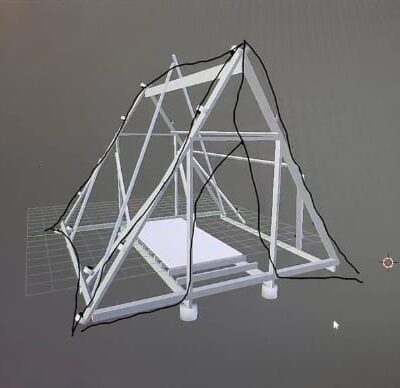
Inspired by the idea of a foam shelter, I have made two highly insulated shelters with ridged foam, raised off the ground and covered in a tarp.

A wood structure like mine pictured above, may be needed to protect from wind and snow. 

The frame was covered with a tarp and inside on the plywood platform was a box made out of foam. This shelter worked extremely well though there are things to keep an eye on in the long term.

Here are some video tours and here is a post devoted just to this shelter (the second one had no wood framing above, just a tarp).

A digital sketch up of a wood A frame on a platform that my foam shelter went inside.

The whole thing was completed with some volunteer and some paid labor for 1000 CAD. 

Such a robust frame is not always necessary. You can build the plywood platform, with foam box on top and simply string a tarp over this if you don’t have strong winds or lots of snow. 

This is the same structure with a tarp over it and the XPS foam box secured with tape inside. The design can be improved by fixing the tarp, painting the foam structure and using clear tape. Please contact me for details if you want help setting something like this up.  

Here’s another example of a foam box. Just don’t put it right on the ground like they did here, and you want another cover on it. This is polyethylene foam which is much more unusual. 

Insulated/Aluminum Tents

These WeatherHyde tents are insulated and the foil on the inside will also block most of the VOCs from the fabric on the outside.

They say you can sleep in them down to 0 degrees Celsius.

They are 600 USD.

They look like they would have problems with airflow and condensation inside. As well as being straight on the ground, but they may work for some people. 

The shift pod for 1300 USD is similar but with the reflective layer on the outside.

This will help reflect the sun and keep cool in sunny weather when there is no shade.

But I don’t know how this will perform well with condensation inside.

The best of the typical tents have an internal mesh layer, then a gap with a rainfly on top. If you don’t use that system you usually end up with condensation. 

There are other similar tents cropping up that were designed for Burning Man festival.

For a lot less you can get a simple aluminum-lined small sleeping tent. It’s not insulated but the aluminum on the inside is more tolerable than the usual tent materials and does reflect heat inside. 

Regular Tent

My tent outside an cob house at OUR ecovillage
My first tent CC BY-NC-SA

There is no perfectly chemical-free tent, The most tolerable brands include Ozark, Big Agnes, REI, LL Bean, Colman, and Lightspeed. Everyone is different. 

Moonlight makes flame retardant-free tents coated with silicone on the outside and polyurethane on the inside.

Here is my post on safer camping gear which goes through all the major brands that folks do well with.

In the post, I also discuss canvas cotton and hemp for really dry climates (or temporary use) which may be where the most sensitive need to start.

I would also check out the cuben fiber tents mentioned in the camping post.

Yurts & Huts

A green plastic yurt on a platform at OUR Ecovillage on Vancouver Island
Me at a yurt at OUR Ecovillage CC BY-NC-SA

Yurts are often tricky for a few reasons. They are normally made out of PVC which takes time to offgas.

On top of that they are difficult to insulate, although one could just use them as an uninsulated tent.

The wooden framing can be susceptible to mold if there is a lot of condensation inside or with high humidity inside, which can happen when heating up a small space.

The wood also might be treated and could cause reactions. There are yurts that have metal framing which may be preferable for some people.

Here is an example of a metal-framed yurt.

You can create your own outer yurt cover by using a more tolerable material, although it will not be as long-lasting as PVC.

You can use materials used to make a tent, or polyethylene sheets that are used for greenhouses, or tarps. You could also go truly traditional and use hides.

One really positive design feature of yurts is that they are lifted off the ground on a platform. All metal yurts may work for some. I have looked at those in the post on simple shelters. 

These glamping tents by sweet water bungalows are PVC, with a canvas top (prone to mustiness), but the guide and framing could be used to create a tent with a plastic of your choosing.

Just keep in mind polyethylene is not as durable, but is less toxic. 

I wouldn’t use canvas for anything other than a short and dry camping trip but without the breathable roof these are prone to condensation.

Conestoga huts have a simple design for a little hut/glorified tent. A simple design that goes up fast is a big benefit.

I have not been able to review these plans for mold preventative building, but it’s an interesting design. If you have the plans for these will do a free review.

If you don’t insulate this it shouldn’t be a problem. If you do want to try these with insulation please reach out to me or an expert in building science. I am not presuming these are a mold-safe design.

Simple Metal SIPS Shelter

Two walls going up of the small metal SIPS house

You can easily put together click-together metal SIPs to make a fast, clean and fairly durable structure.

SIPS are structurally integrated panels. Metal SIPS are made of steel-styrofoam-steel sandwiched together. A highly tolerable material for those with severe sensitivities.

Because these are structural you don’t need to build a frame. Pour a concrete slab, and then once you have the panels it’s fast.

To create a long-lasting structure you would add siding but if you need something done fast, just put it up.

This little shelter is made with Structural Building Systems panels.

A small metal SIPS house in the desert

Sheds

Steel sheds can be bought from Amazon or hardware stores for 700-1000 dollars.

You will also need to build a foundation (you could also just leave it as gravel), pay for labor to set it up, caulk the whole structure and likely put in some insulation.

For everything you need to know about setting up a shed to live in see this post by EI Wellspring.

Sheds are not as easy to take down as you would expect.

There are also wooden and plastic sheds. I have seen some good little wooden shed kits made of solid wood.

Raise them off the ground and cover with a tarp above that is not touching the shed.

I like cedarshed.com for those who can tolerate cedar because it’s a highly rot-resistant wood.

Check out the wood first, see how it was stored and test it for reactions. 

Hard plastic sheds will work for many people. The more flexible the plastic the more it offgasses. PVC should be avoided where possible.

Glass Enclosures 

A greenhouse in the desert used as a shelter
www.buildahealthyhouse.com

A greenhouse can be used for backup shelter, it gets very hot when the sun hits them in warmer seasons and can dip really low at night in colder temps.

But some people have used them successfully. Margaret (another person who used this strategy to heal and make it back to indoor housing) talks about her experience with them here (her greenhouse pictured above). 

Other glass/metal enclosures brands are Handi Hut and Four Season.

Small sketch up for a glass and foam stucture with glass as the interior walls and foam on the outside with a tarp over it.

I designed an all-glass on the interior shelter with insulation on the outside. This was designed for a time that I could not have metal or wood inside touching me.

The walls and floor were glass. The ceiling would be easier to make out of metal.

The shelter was raised off the ground on a platform. Outside of the glass was 2 inches of foam insulation. To hold this insulation on, the exterior framing (outside of the foam layer) was attached by drilling through the foam and glass. The foam needs to be airtight to the glass. A tarp should cover the shelter.

Back of a Pick-Up Truck

Try and find an aluminum canopy for the back of the truck, which is the best-tolerated type.

The bed liner may need to be offgassed or can be covered with Reflectix.

If ordering a brand new truck you can request no liner.

Cargo Trailer

A cargo trailer that I converted into a RV

Details on converting a cargo trailer safe in this post. 

The company WeRoll can customize these and they have more robust roof lines compared to the standard models. 

Ambulances and Refrigerated Trucks

A decommissioned ambulance used as an RV home

The benefit to these two options is that they are already insulated and ready to go.

A decommissioned ambulance is insulated and offgassed since they already have quite a few years on them by the time the government sells them off.

Refrigerated trucks could be found either new or used and they are well insulated and also ready to go.

If you went new you would have to check out the offgassing levels to see if it suits you, but I would expect it to last longer.

Creating a Safe-Room in Your House 

To create a non-toxic room in your home you can use Denny Foil, or heavy-duty aluminum foil on the walls/ceiling/floor.

These materials block VOCs (chemicals/toxins including mold).

Heavy-duty aluminum foil is much easier to work with than the type used in cooking. You may need several layers to totally block smells. 

You want to use green Painting Tape for this as it will not damage the walls and is easy to remove – a healthy person could rip off/take down the whole room is probably 20-30 min (small room). The blue tape is toxic so I wouldn’t use that. You could use aluminum tape but it is very sticky and will leave a residue and will be hard to take off. Aluminum tape also smells and offgasses more than green tape.  

I would not do this where you have colder air inside than outside (AC use). 

Cover outlets. As for light fixtures, I would go around them. 

The only thing in the room should be clean bedding i.e. a new non-toxic mattress or camping cot (etc). New non-toxic bedding and pillow.

Be careful that when you open the window or the door that the air coming in might not be good, so this won’t be a long-term solution. 

If you can’t foil the walls you can make a room within a room and use positive pressure as explained here in this post. The picture above shows how pressurized rooms keep out contaminants.

You can use foam, plastic or any airtight material. Isolate that by using positive pressure which will work to reduce chemicals like offgassing.

That can be a solution for someone extremely sensitive who has trouble with offgassing (when the issue is offgassing rather than mold).

You can find more information by researching isolation rooms. 

Ecovillages

A cob house at OUR Ecovillage on Vancouver Island
A cob house at OUR Ecovillage CC BY-NC-SA

Staying in a cob house (or straw bale, adobe, light straw-clay house) can be a really good option 

Ecovillages may rent out rooms in natural homes and there is a possibility of getting in on the communal meal plan as well. Search for some in your area and ask about monthly stays.

I have seen some natural homes listed on AirBnB as well as on lists of intentional communities/ecovillages. 

Always ask about propane, natural gas, cleaning products, and water damage. I have found that is wet/cold climates cob and similar materials do not hold up to mold after a few years.

Slabs and roofs often have mistakes that lead to mold. Green roofs can be very problematic. Amateur built houses are especially prone to mistakes that lead to mold.

This type of building is best when raised off the ground, or with a simple roof, otherwise, don’t bank on this being safe if more than 1-3 years old. 

Ecovillages are also a good place to set up a tent where you might have access to outdoor bathrooms and kitchens that are more MCS safe than campgrounds.

It may also be a safer environment for those traveling solo. I have used the Intentional Communities website, Google for places near you, and the site wwoofing.

If you have physical energy you can work on a wwoofing site in exchange for free rent (camping or small cabin usually) and often food.

Another option for those who have energy to do work is remote cabins that are advertised on Craigslist where you do some house and yard work in exchange for rent. The cabins might not be safe, but this could be a free spot to camp or live in a trailer. 

Other Emergency Housing

We should have emergency and long-term safe housing for people with MCS, but in reality, there is very little.

Check out the Environmental Health Association of Québec if you are a Quebecer. 

For housing listings in the US and Canada, join EI Safe Housing on Facebook. 

When I come across AirBnBs, hotels and short-term rentals that look safe I list them on my Pinterest page.

While many turn to Airbnb or other short-term rentals, in the beginning, this can be a difficult and sometimes impossible road if one is super sensitive and/or masked to mold. 

healthy home build consult

Corinne Segura is a Building Biologist Practitioner with 6 years of experience helping others create healthy homes.

I spent two years in tents and small structures in order to heal from extreme chemical sensitivity. 


Did you find this post helpful? If so you can buy me a coffee to support the research behind this blog. Thank you!

Buy Me a Coffee at ko-fi.com


SaveSave
SaveSave

Filed Under: Healthy Interiors, Mold-Free Interiors, Tiny Homes and Trailers Tagged With: camping, emergency housing, mold avoidance paradigm, tiny homes and trailers

Simple Insulated Shelter for Chemical Sensitivity (MCS) and Mold Avoidance

November 3, 2019 by Corinne 8 Comments

I recommend all of the products here, some products have affiliate programs and some do not. Upon purchase, I earn a small commission through affiliate links at no extra cost to you.

This post is about two highly insulated shelters I made with rigid foam, raised off the ground and covered in a tarp. 

These shelters are super simple, super tolerable for the chemically sensitive and are ideal for mold avoidance in cold weather (or even in hot weather).

This has the same insulative value that a house would have. I was very warm inside in Canadian winters with one space heater. This shelter can work in any climate, though it will not survive a hurricane! It was highly tolerable for MCS and a good set up for mold avoidance.

These shelters were an incredibly important step in me healing enough to live inside. The shelter was the last step in mold avoidance before I moved back inside. I moved back into regular housing for the first time in 8 years, and I continue to recover.

Living inside for one year now!

This is something I wish I had known about much earlier on, as tent living and custom trailers/vans are difficult to make and to live in, especially in cold weather. It’s hard to keep a steady temperature, it’s difficult to insulate trailers and vans, and it’s hard to keep them from going moldy. This shelter solved all those problems.

A wood frame like mine (pictured) is needed to protect the shelter from high winds and snow. My frame was very robust, survived a massive wind storm and big snowfall. If you don’t require snow and wind protection, simply tie up a tarp over the raised up foam shelter and skip the frame altogether. 

Building the Simple Shelter

The shelter is made of a plywood platform and a wood frame, though you could use metal or another material. We used some pressure treated wood for the framing and some non-treated wood.

Most of the points touching the ground are stumps, for added protection from rotting out (you can see that in the vide

The interior is an XPS foam box. The box was made to fit the plywood, it was 4 x 6 feet but you can make this any size you choose. The height we decided on was 6 ft. 

You can use any thickness of XPS that you want. Though for this to hold itself up without any supports (other than tape) as it’s designed, I would use 2 inches.

What I would do differently next time is paint the foam with ECOs primer and paint and possibly seal with shellac. This will seal in flame retardants and the very minimal off-gassing. Most extremely sensitive people do well with this foam.

I made a model to test out ECOS paint and shellac and it worked really well (both the porch paint and the vinyl siding paint worked). With or without Zinsser Bullseye Shellac.

I would also use clear tape next time because it would look better!

I would buy a tarp that covered the wood but still had air movement underneath.

When you are heating you should seal up as much as you can on the inside with the tape that you tolerate. Green painters tape or Siga tape are the most tolerated types. 

When taping the outside in heating season do not cover the seams fully, just enough to hold it together like in the videos.

In cooling season it’s the opposite (if you did put AC in there). 
Such a robust frame is not always necessary. You can build the plywood platform, with foam box on top and simply string a tarp over this if you don’t have strong winds or a lot of snow.

A number of details are necessary to control condensation on the inside of the tarp in heating season, as condensation can drip down onto the wood or foam. We used spacers on the sides, a criss-cross on the top, and a piece of plastic suspended above the roof of the foam shelter to stop water from dripping down and wood from getting wet and moldy. 

Please contact me for details if you want help setting something like this up.  

This shelter worked extremely well though there are things to keep an eye on in the long term. Here are some video tours which will help you to picture how it works, shows the spacers, and other details like windows and power. 

The whole thing was completed with some volunteer labor and some paid labor for 1000 CAD.  I used two 100 ft extension cords (10 or 12 gauge) to power this heater and my laptop and light. You need one dedicated 10-12 gauge cord if it’s 100 ft, for a 12.5 amp, 1500 watt heater. Plenty of heat for a small space! You can’t have anything else on that circuit in the house it’s running from or inside on that cord).

I used this plugin thermostat to control the temperature and keep it very even (which needed a surprising amount of offgassing). I strung up this bulb (the string needed some offgassing).

I used the Mondo King Thermarest and I covered it in two Husky bags (taped together) to keep it dry. A small fridge was kept outside in my trailer, on a different circuit. 

I used this little portable tub to “shower” in outside, and the luggable loo. More pictures of the framing:


Filed Under: Tiny Homes and Trailers Tagged With: camping, emergency housing, mold avoidance paradigm

Primary Sidebar

Stay up to date with the Latest!

  • Facebook
  • Instagram
  • YouTube

ABOUT ME

Hi, I’m Corinne, I am a Certified Building Biologist Practitioner with 7 years of experience helping people create healthy homes.

More about me…

Footer

Categories

  • Healthy Building
  • Healthy exteriors/gardens
  • Healthy Interiors
  • Mold Avoidance Paradigm
  • Mold-Free Building
  • Mold-Free Interiors
  • Tiny Homes and Trailers
  • Uncategorized

Amazon Affiliate Disclosure: As an Amazon Associate I earn from qualifying purchases.

Privacy Policy, Disclaimer, Disclosure

Do Not Sell My Personal Information

Resources

Business inquiries

Copyright © 2022 · Corinne Segura | My Chemical-Free House Consulting